前言
资料包下载:
这里是我们这次训练营所需要的所有资料包,有多个分发链接:
- Onedrive:https://1drv.ms/u/s!AooWhIO43OtzgtNA590N3-cJrjZD6w?e=sgTHSY
- 百度云盘: 链接:https://pan.baidu.com/s/1oy_KtTddgqGQ0aojsfQszQ?pwd=z7nj 提取码:z7nj
简介
本次飞腾训练营是围绕以飞腾派开发板为核心的飞腾小车展开一系列的包括ArceOS操作系统内核、驱动以及算法等内容的学习与实现。
飞腾派
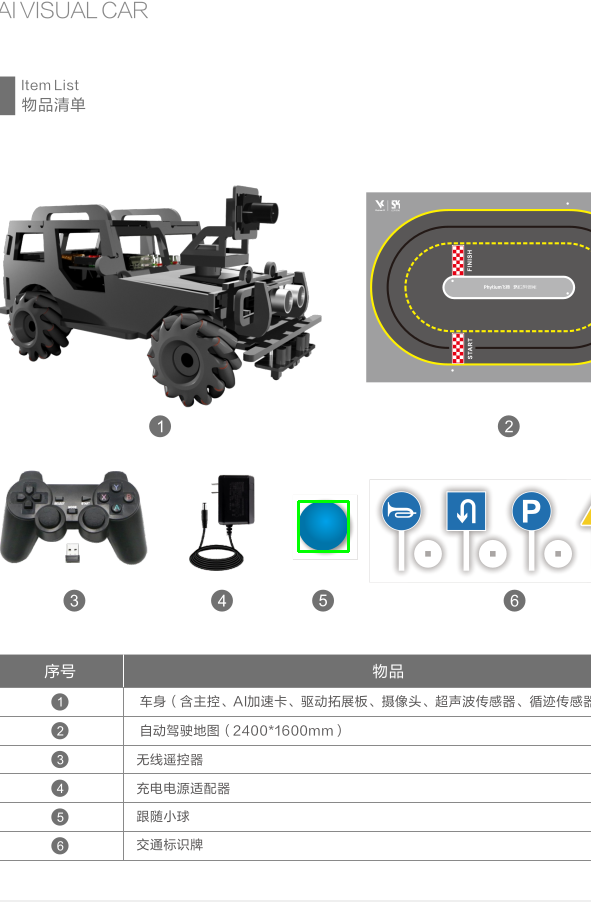
飞腾派开发板是飞腾公司针对教育行业推出的一款国产开源硬件平台,兼容 ARM v8-A 处理器架构。飞腾小车是一款利用飞腾派开发板组装的小车,它是一个计算机编程实验平台,包含电机驱动、红外传感器、超声传感器、AI加速棒、视觉摄像云台等,可以满足学生学习计算机编程、人工智能训练等课题。
ArceOS
ArceOS是一个基于Rust语言的Unikernel,它的目标是为云计算平台提供一种高性能、高可靠、高安全、易开发的操作系统解决方案。ArceOS的设计思路是将操作系统的核心功能和应用程序紧密集成在一起,形成一个单一的可执行镜像,这个镜像包含了应用程序所需的所有功能组件,包括网络协议、文件系统和设备驱动等。而组成ArceOS的功能组件是可以独立存在的,并可以与其它功能组件组合,形成新的领域操作系统内核。
目标
让参与飞腾训练营的学生以及工程师们了解和学习如何在飞腾派上使用和开发不同的操作系统,并且掌握如何进行飞腾派上的各类驱动开发,例如I2C驱动、USB驱动等。从而吸引更多优秀的人才利用飞腾派做出更有价值的内容。
时间安排
介绍
ArceOS
ArceOS是一个基于Rust语言的Unikernel,它的目标是为云计算平台提供一种高性能、高可靠、高安全、易开发的操作系统解决方案。ArceOS的设计思路是将操作系统的核心功能和应用程序紧密集成在一起,形成一个单一的可执行镜像,这个镜像包含了应用程序所需的所有功能组件,包括网络协议、文件系统和设备驱动等。而组成ArceOS的功能组件是可以独立存在的,并可以与其它功能组件组合,形成新的领域操作系统内核。
辰龙操作系统
辰龙操作系统是基于清华大学 ArceOS 操作系统的发行版,旨在为智能汽车、机器人、物联网等领域的复杂系统提供高安全、高性能和自主可控的国产操作系统解决方案。
飞腾小车
飞腾派开发板是飞腾公司针对教育行业推出的一款国产开源硬件平台,兼容 ARM v8-A 处理器架构。飞腾小车是一款利用飞腾派开发板组装的小车,它是一个计算机编程实验平台,包含电机驱动、红外传感器、超声传感器、AI加速棒、视觉摄像云台等,可以满足学生学习计算机编程、人工智能训练等课题。
环境配置
- 在 Windows 上安装 WSL
- 安装 Ubuntu-22.04
- 安装过程详见 1.1 中链接。以下是可安装的有效分发的列表:
| NAME | FRIENDLY NAME |
|---|---|
| Ubuntu | Ubuntu |
| Debian | Debian GNU/Linux |
| kali-linux | Kali Linux Rolling |
| Ubuntu-18.04 | Ubuntu 18.04 LTS |
| Ubuntu-20.04 | Ubuntu 20.04 LTS |
| Ubuntu-22.04 | Ubuntu 22.04 LTS |
| OracleLinux_8_5 | Oracle Linux 8.5 |
| OracleLinux_7_9 | Oracle Linux 7.9 |
| SUSE-Linux-Enterprise-Server-15-SP4 | SUSE Linux Enterprise Server 15 SP4 |
| openSUSE-Leap-15.4 | openSUSE Leap 15.4 |
| openSUSE-Tumbleweed | openSUSE Tumbleweed |
-
安装 rust
-
rust 官网:https://www.rust-lang.org/
-
安装 rust:
curl --proto '=https' --tlsv1.2 -sSf https://sh.rustup.rs | sh -
获取 rust 的最新版本:
rustup update -
配置环境变量:
vim ~/.bashrc -
按 i 键进入编辑模式,在文件最后加入:
export PATH=~/.cargo/bin:$PATH -
按 Esc 键退出编辑模式,按 : 键并输入 wq,保存并退出。
-
加载修改后的配置:
source ~/.bashrc -
检查 cargo 是否能正常使用(查看版本):
cargo --version -
更多关于 rust 的安装可参考:https://www.rust-lang.org/tools/install
-
-
安装 git
sudo apt update sudo apt install git -
安装 make
sudo apt install make
OS 环境配置
目前实验内容可支持在 Ubuntu操作系统 上进行操作。
对于 Windows10/11 的用户可以通过系统内置的 WSL2 虚拟机(请不要使用 WSL1)来安装 Ubuntu 22.04,步骤如下:
-
升级 Windows 10/11 到最新版(Windows 10 版本 18917 或以后的内部版本)。注意,如果不是 Windows 10/11 专业版,可能需要手动更新,在微软官网上下载。升级之后, 可以在 PowerShell 中输入
winver命令来查看内部版本号。 -
「Windows 设置 > 更新和安全 > Windows 预览体验计划」处选择加入 “Dev 开发者模式”。
-
以管理员身份打开 PowerShell 终端并输入以下命令:
# 启用 Windows 功能:“适用于 Linux 的 Windows 子系统”
>> dism.exe /online /enable-feature /featurename:Microsoft-Windows-Subsystem-Linux /all /norestart

# 启用 Windows 功能:“已安装的系统虚拟机平台”
>> dism.exe /online /enable-feature /featurename:VirtualMachinePlatform /all /norestart

# <Distro> 改为对应从微软应用商店安装的 Linux 版本名,比如:`wsl --set-version Ubuntu 2`
# 如果你没有提前从微软应用商店安装任何 Linux 版本,请跳过此步骤
>> wsl --set-version <Distro> 2

# 设置默认为 WSL 2,如果 Windows 版本不够,这条命令会出错
>> wsl --set-default-version 2

# 启用运行 WSL 并安装 Linux 的 Ubuntu 发行版所需的功能,根据向导设置用户名和密码
>> wsl --install
注解👉
由于时间问题我们主要在 Ubuntu22.04 on x86-64 上进行了测试,后面的配置也是基于此环境进行。你也可以在其他 Linux 发行版上进行实验,基本上不会出现太大的问题。如果遇到了问题的话,请在本节的讨论区中留言,我们会尽量帮助解决。
Rust 开发环境配置
首先安装 Rust 版本管理器 rustup 和 Rust 包管理器 cargo,这里我们用官方的安装脚本来安装:
curl https://sh.rustup.rs -sSf | sh
如果通过官方的脚本下载失败了,可以在浏览器的地址栏中输入 https://sh.rustup.rs 来下载脚本,在本地运行即可。
如果官方的脚本在运行时出现了网络速度较慢的问题,可选地可以通过修改 rustup 的镜像地址(修改为中国科学技术大学的镜像服务器)来加速:
export RUSTUP_DIST_SERVER=https://mirrors.ustc.edu.cn/rust-static
export RUSTUP_UPDATE_ROOT=https://mirrors.ustc.edu.cn/rust-static/rustup
curl https://sh.rustup.rs -sSf | sh
或者使用 tuna 源来加速 参见 rustup 帮助:
export RUSTUP_DIST_SERVER=https://mirrors.tuna.tsinghua.edu.cn/rustup
export RUSTUP_UPDATE_ROOT=https://mirrors.tuna.tsinghua.edu.cn/rustup/rustup
curl https://sh.rustup.rs -sSf | sh
或者也可以通过在运行前设置命令行中的科学上网代理来实现:
# e.g. Shadowsocks 代理,请根据自身配置灵活调整下面的链接
export https_proxy=http://127.0.0.1:1080
export http_proxy=http://127.0.0.1:1080
export ftp_proxy=http://127.0.0.1:1080
安装完成后,我们可以重新打开一个终端来让之前设置的环境变量生效。我们也可以手动将环境变量设置应用到当前终端,只需要输入以下命令:
source $HOME/.cargo/env
接下来,我们可以确认一下我们正确安装了 Rust 工具链:
rustc --version
可以看到当前安装的工具链的版本。
rustc 1.70.0 (90c541806 2023-05-31)
可通过如下命令安装 rustc 的 nightly 版本,并把该版本设置为 rustc 的默认版本。
rustup install nightly
rustup default nightly
我们最好把软件包管理器 cargo 所用的软件包镜像地址 crates.io 也换成中国科学技术大学的镜像服务器来加速三方库的下载。我们打开(如果没有就新建) ~/.cargo/config 文件,并把内容修改为:
[source.crates-io]
registry = "https://github.com/rust-lang/crates.io-index"
replace-with = 'ustc'
[source.ustc]
registry = "git://mirrors.ustc.edu.cn/crates.io-index"
同样,也可以使用 tuna 源 参见 crates.io 帮助:
[source.crates-io]
replace-with = 'tuna'

[source.tuna]
registry = "https://mirrors.tuna.tsinghua.edu.cn/git/crates.io-index.git"
接下来安装一些Rust相关的软件包
rustup target add riscv64gc-unknown-none-elf
rustup component add llvm-tools-preview
rustup component add rust-src
警告⚠️
如果你更换了另外一个 rustc 编译器(必须是 nightly 版的),需要重新安装上述 rustc 所需软件包。ArceOS 仓库中的
Makefile包含了这些工具的安装,如果你使用make run也可以不手动安装。
至于 Rust 开发环境,推荐 JetBrains Clion + Rust插件 或者 Visual Studio Code 搭配 rust-analyzer 和 RISC-V Support 插件。
注解👉
JetBrains Clion 付费商业软件,但对于学生和教师,只要在 JetBrains 网站注册账号,可以享受一定期限(半年左右)的免费使用的福利。
- Visual Studio Code 是开源软件,不用付费就可使用。
- 当然,采用 VIM,Emacs 等传统的编辑器也是没有问题的。
QEMU 模拟器安装
我们需要使用 QEMU 7.0 版本进行实验,低版本的 QEMU 可能导致框架代码不能正常运行。而很多 Linux 发行版的软件包管理器默认软件源中的 QEMU 版本过低,因此我们需要从源码手动编译安装 QEMU 模拟器软件。下面以 Ubuntu 22.04 上的安装流程为例进行说明:
首先我们安装依赖包,获取 QEMU 源代码并手动编译:
# 安装编译所需的依赖包
sudo apt install autoconf automake autotools-dev curl libmpc-dev libmpfr-dev libgmp-dev \
              gawk build-essential bison flex texinfo gperf libtool patchutils bc \
              zlib1g-dev libexpat-dev pkg-config  libglib2.0-dev libpixman-1-dev libsdl2-dev \
              git tmux python3 python3-pip ninja-build
# 下载源码包
# 如果下载速度过慢可以使用我们提供的百度网盘链接:https://pan.baidu.com/s/1dykndFzY73nqkPL2QXs32Q
# 提取码:jimc
wget https://download.qemu.org/qemu-7.0.0.tar.xz
# 解压
tar xvJf qemu-7.0.0.tar.xz
# 编译安装并配置 RISC-V 支持
cd qemu-7.0.0
./configure --target-list=riscv64-softmmu,riscv64-linux-user  # 如果要支持图形界面,可添加 " --enable-sdl" 参数
make -j$(nproc)
注解👉
注意,上面的依赖包可能并不完全,比如在 Ubuntu 18.04 上:
- 出现
ERROR: pkg-config binary 'pkg-config' not found时,可以安装pkg-config包;- 出现
ERROR: glib-2.48 gthread-2.0 is required to compile QEMU时,可以安装libglib2.0-dev包;- 出现
ERROR: pixman >= 0.21.8 not present时,可以安装libpixman-1-dev包。
另外一些 Linux 发行版编译 QEMU 的依赖包可以从 这里 找到。
之后我们可以在同目录下 sudo make install 将 QEMU 安装到 /usr/local/bin 目录下,但这样经常会引起冲突。个人来说更习惯的做法是,编辑 ~/.bashrc 文件(如果使用的是默认的 bash 终端),在文件的末尾加入几行:
# 请注意,/path/to是qemu-7.0.0 的父目录,应调整为实际的安装位置
export PATH=$PATH:/path/to/qemu-7.0.0/build
随后即可在当前终端 source ~/.bashrc 更新系统路径,或者直接重启一个新的终端。
此时我们可以确认 QEMU 的版本:
qemu-system-riscv64 --version
qemu-riscv64 --version
警告⚠️
请尽量不要安装
qemu-kvm,这可能会导致我们的框架无法正常运行。另外,我们仅在 Qemu 7.0.0 版本上进行了测试,请尽量不要切换到其他版本。
Q & A
当安装编译所需的依赖包出现Package xxx is not available, but is referred to by another package 错误时,可以尝试更新系统软件源,执行如下命令:
sudo apt-get update
sudo apt-get upgrade
其它工具安装
本节主要介绍 arceos 编译所需的依赖工具的安装。
为了使用 objdump、objcopy 工具,我们首先需要安装名为 cargo-binutils 的命令行工具集:
cargo install cargo-binutils
为了编译运行 C 应用程序,安装 libclang-dev:
sudo apt install libclang-dev
下载并安装 cross-musl-based工具链:
# download
wget https://musl.cc/aarch64-linux-musl-cross.tgz
wget https://musl.cc/riscv64-linux-musl-cross.tgz
wget https://musl.cc/x86_64-linux-musl-cross.tgz
# install
tar zxf aarch64-linux-musl-cross.tgz
tar zxf riscv64-linux-musl-cross.tgz
tar zxf x86_64-linux-musl-cross.tgz
# exec below command in bash OR add below info in ~/.bashrc
export PATH=`pwd`/x86_64-linux-musl-cross/bin:`pwd`/aarch64-linux-musl-cross/bin:`pwd`/riscv64-linux-musl-cross/bin:$PATH
运行 helloworld unikernel
本节介绍如何在 QEMU 模拟器上运行 helloworld unikernel。
-
执行如下命令,获取 ArceOS 源码包:
git clone https://github.com/rcore-os/arceos.git -
进入arceos目录,执行如下命令,编译并运行 helloworld unikernel:
make ARCH=riscv64 A=apps/helloworld run其中,
ARCH 指定 CPU 体系架构,目前支持选项:
riscv64,aarch64,x86_64。A 指定用户程序的相对路径。
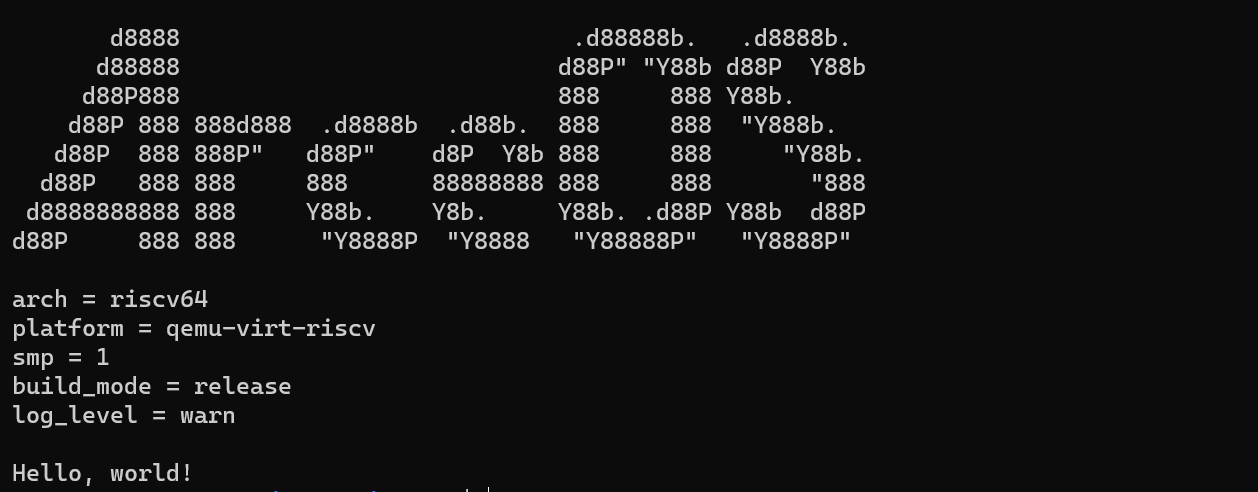
到这里,恭喜你完成了实验环境的配置,可以开始阅读教程的正文部分了!
Q & A
当代码跑不起来的时候,可以尝试:
- 分支是否与 原版仓库(而非 fork 出来的仓库)的对应分支同步。如不同步的话考虑通过
git pull进行更新。注:这是因为 Rust 的版本更迭较快,如不及时更新的话曾经能正常运行的代码也会无法运行。 - 项目根目录下的
rust-toolchain非常重要,它代表整个项目采用的 Rust 工具链版本。请务必保持其与原版仓库对应分支一致。 - 通过
make clean或者cargo clean删除构建产物,并重新make run。注:出现这样的问题通常说明框架的构建脚本存在 bug,可以提 issue。
如果怀疑遇到了网络问题,可以检查:
- 请按照本章说明进行 Rust 安装和 crates.io 镜像配置。通常情况下能够解决 Rust 工具链更新和下载已发布到 crates.io 上库的问题。
时间安排
ArceOS 框架设计
ArceOS的整体架构如下所示:
ArceOS 是一个开源的、组件化的Unikernel。以组合组件库的方式构建系统。使用Rust开发。
具有以下特点和功能:
- CPU架构: x86_64, riscv64, aarch64
- 运行平台: QEMU pc-q35 (x86_64), virt (riscv64/aarch64)
- 支持多线程: Multi-thread
- 调度算法: FIFO/RR/CFS scheduler
- 虚拟IO: VirtIO net/blk/gpu drivers
- 网络协议: TCP/UDP net stack using smoltcp
- 同步/互斥: Synchronization/Mutex
- SMP调度: SMP scheduling with single run queue
- 文件系统: File system
ArceOS 由apps、crates、modules组成
- apps: 应用程序。它的运行需要依赖于modules组件库。
- modules: ArceOS的组件库。
- crates: 通用的基础库。为modules实现提供支持。
当前ArceOS项目的apps列表如下:
Applications (Rust)
| App | Extra modules | Enabled features | Description |
|---|---|---|---|
| helloworld | A minimal app that just prints a string | ||
| exception | paging | Exception handling test | |
| memtest | axalloc | alloc, paging | Dynamic memory allocation test |
| display | axalloc, axdisplay | alloc, paging, display | Graphic/GUI test |
| yield | axalloc, axtask | alloc, paging, multitask, sched_fifo | Multi-threaded yielding test |
| parallel | axalloc, axtask | alloc, paging, multitask, sched_fifo, irq | Parallel computing test (to test synchronization & mutex) |
| sleep | axalloc, axtask | alloc, paging, multitask, sched_fifo, irq | Thread sleeping test |
| priority | axalloc, axtask | alloc, paging, multitask, sched_cfs | Thread priority test |
| shell | axalloc, axdriver, axfs | alloc, paging, fs | A simple shell that responds to filesystem operations |
| httpclient | axalloc, axdriver, axnet | alloc, paging, net | A simple client that sends an HTTP request and then prints the response |
| echoserver | axalloc, axdriver, axnet, axtask | alloc, paging, net, multitask | A multi-threaded TCP server that reverses messages sent by the client |
| httpserver | axalloc, axdriver, axnet, axtask | alloc, paging, net, multitask | A multi-threaded HTTP server that serves a static web page |
| udpserver | axalloc, axdriver, axnet | alloc, paging, net | A simple echo server using UDP protocol |
Applications (C)
| App | Extra modules | Enabled features | Description |
|---|---|---|---|
| helloworld | A minimal C app that just prints a string | ||
| memtest | axalloc | alloc, paging | Dynamic memory allocation test in C |
| sqlite3 | axalloc, axdriver, axfs | alloc, paging, fp_simd, fs | Porting of SQLite3 |
基础阶段:ArceOS在飞腾派上的移植与适配
飞腾派运行ArceOS
1 硬件准备
-
飞腾派板子

-
一张SD卡和一个读卡器,用于安装飞腾派官方镜像
-
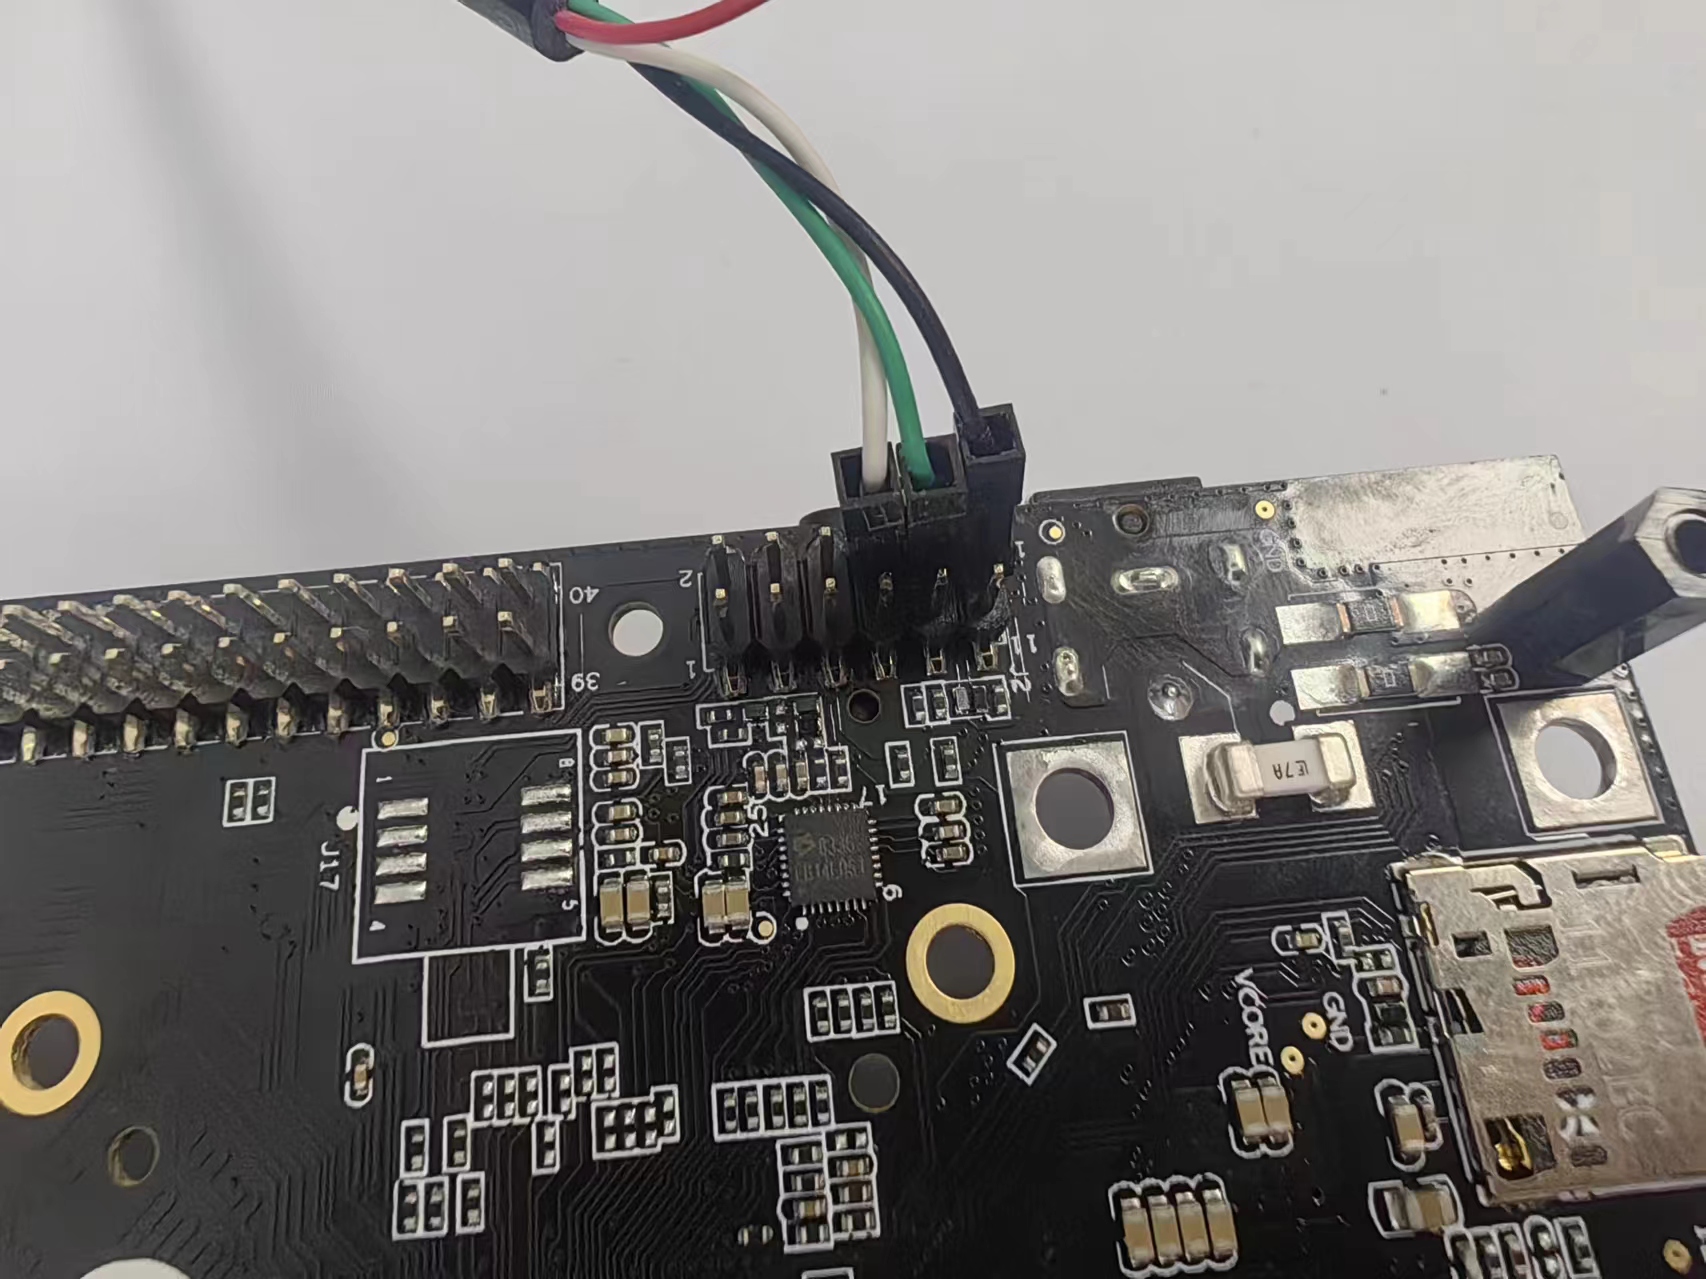
USB转TTL转换器和串口线,用于将飞腾派串口和电脑USB接口连接在一起,方便收发调试信息和文件
2 烧录镜像
-
如果你不只是在飞腾派运行Arceos,还需要在飞腾派上运行Ubuntu,则需要下载如下镜像:
Ubuntu镜像地址:(在系统镜像>1-Ubuntu...>4GB>之前版本中的sd_boot_xfce_4GB_230726.img.tar.gz)
-
需要注意的是烧录Ubuntu镜像需要至少16G的SD卡,如果你的SD卡不足16G,或者只是想运行Arceos,则无需下载Ubuntu镜像,此时只需下载uboot镜像即可。由于uboot镜像占用的空间只有4MB左右,可以认为对SD卡的容量没有要求:
uboot镜像地址:(在4-系统源码>4-系统源码>uboot固件>fip-all-4GB-250321.bin)
-
如果你电脑主机上运行的是Windows,需要下载烧录工具(Win32DiskImager2.0.1.8.exe)
烧录工具的地址:(在飞腾派v2.1资料包(资料包太...>9-工具包中的Win32DiskImager2.0.1.8.exe)
-
如果你电脑主机上运行的是Linux,直接使用
dd命令即可
3 编译Arceos
ArceOS代码地址:https://github.com/arceos-usb/arceos_experiment/tree/usb-camera-base(注意分支)
git clone https://github.com/arceos-usb/arceos_experiment.git	# 下载源码
cd arceos_experiment
make A=apps/usb-hid PLATFORM=aarch64-phytium-pi LOG=trace	# 编译镜像,生成的bin文件在apps/usb-hid目录下
4 运行Arceos
注:uboot支持多种方法启动Arceos,如从U盘启动、从SD卡启动、从局域网启动。如果你是在调试或开发Arceos,建议从局域网启动,这样可以避免频繁插拔SD卡或U盘。
-
飞腾派上电启动,把烧录了uboot的SD卡插到飞腾派上。如果选择了从U盘启动,还需要把装有arceos的镜像文件的U盘插在飞腾派的usb插槽上(靠近风扇的蓝色口的)。用USB转TTL转换器把飞腾派与电脑相连接,启动电脑上的远程连接软件(如果是Windows系统,可以使用MobaXterm;如果是Linux系统,可以使用minicom命令),波特率设置为115200
-
串口接法:接8、10、12号引脚位置,如图所示(8号代表TX,接RX;10号代表RX,接TX;12号接地线)
- 在uboot倒计时结束前按任意键进入手动引导
-
如果是从U盘启动
输入
usb start,启用USB驱动来识别插入的USB设备(读U盘中的arceos)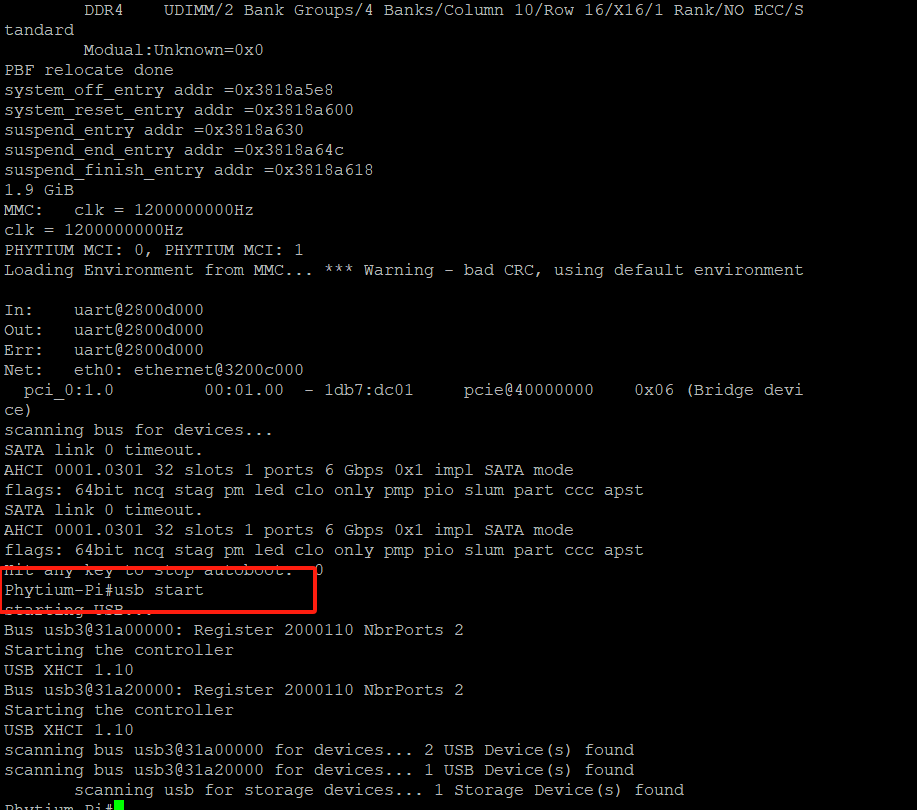
输入
fatload usb 0 0x90100000 usb-hid_aarch64-phytium-pi.bin,从插入的USB设备上下载ArceOS镜像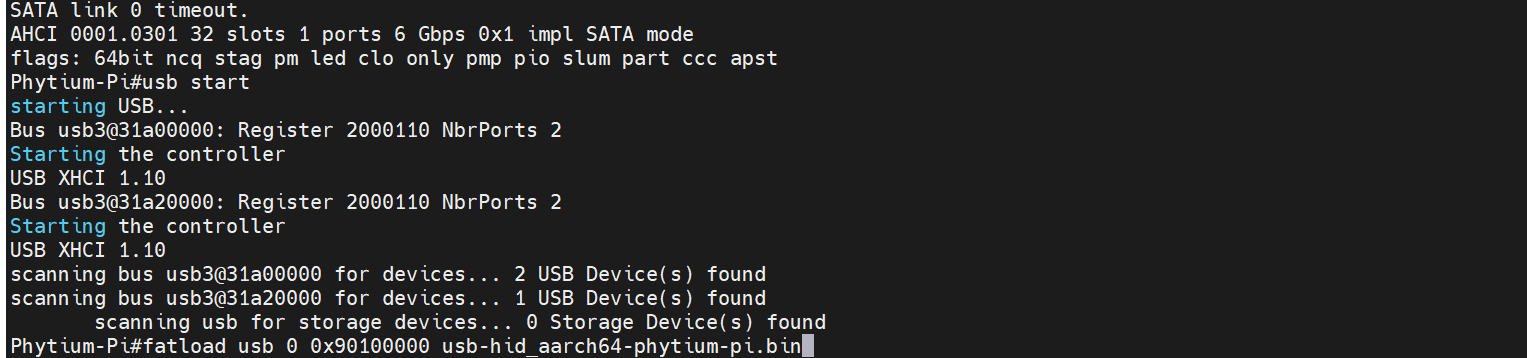
-
如果是从局域网启动
在电脑端,要安装tftp服务
sudo apt install tftpd-hpa
vim /etc/default/tfptpd-hpa	# 配置tftp服务
# 需要把生成的Arceos镜像复制进配置文件所指定的tftp目录里
在飞腾派端,使用tftpboot命令加载Arceos镜像
echo $ipaddr # 检查ip地址满足局域网要求 setenv ipaddr x.x.x.x # 如不满足,需先设置ip地址 setenv serverip x.x.x.x tftpboot 0x90100000 xxx.bin dcache flush -
输入
go 0x90100000加载ArceOS镜像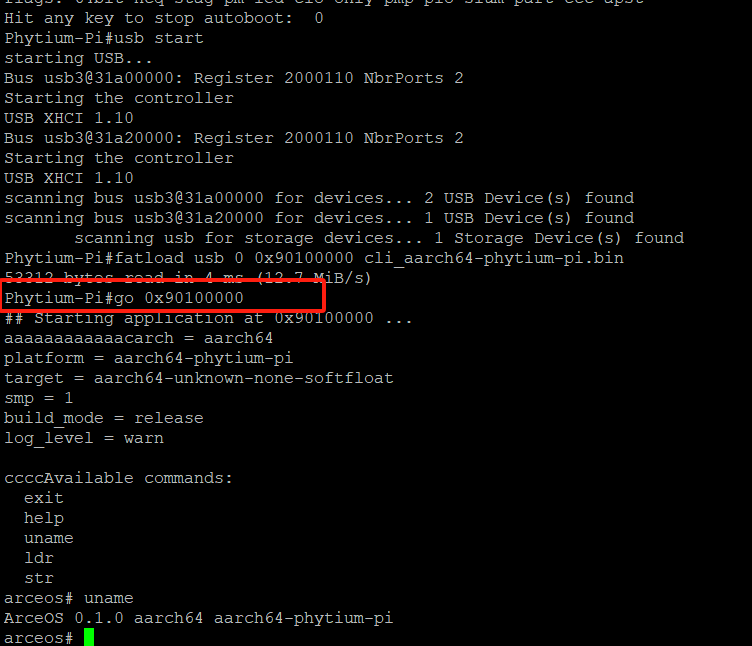
(这里是没有添加LOG=debug)
-
如果是在apps/cli目录下编译的出来的arceos镜像,便可以看到ArceOS启动成功,进入到了shell界面
-
更直观方便的实验方法,在linux终端里面测试USB返回的debug信息
Usbipd是一种将USB设备连接到WSL上面的工具,可以将串口返回的信息映射到WSL终端里面,方便实验
下载流程如下
打开powershell,输入winget search usbipd,
找到usbipd工具之后,输入winget install usbipd
下载usbipd。
下载完成之后,输入usbipd list,查看主机上连接好的串口ID号
输入sudo usbipd bind -b 2-2,实现串口设备全机器共享,
输入usbipd attach --wsl -b 2-2,实现串口返回信息映射到wsl终端
>(2-2是串口ID号,具体依据个人电脑上显示的串口ID号)
这里需要注意的是,主机上只能留下一个linux终端,不然串口返回的信息不清楚该映射到哪一个终端界面
打开linux终端,输入sudo chmod 777 /dev/ttyUSB0,赋予串口映射到wsl上的权限,
(ttyUSB0通常表示接到计算机的第一个串行设备,在个人主机上具体是多少,可以通过输入 ls -l /dev 来查看)
然后请你下载python3,同时下载xmodem,pyserial
方便加载脚本的py文件的运行
在项目根目录下输入:
make A=apps/uvc PLATFORM=aarch64-phytium-pi LOG=trace chainboot
前面的make是将整个arceos内核与USB驱动给编译好,
后面的chainboot用来执行一个arceos_experiment目录中的一个脚本文件,将编译好的内核文件通过SD卡中的Uboot加载到飞腾派上
在看到tools/….出来之后,给飞腾派上电,同时确保鼠标已经插到了飞腾派上
等待uboot加载完之后,看到Phytium-Pi#出现,
输入go 0x90100000,arceos内核开始运行,接着usb驱动的debug信息
I2C 介绍
I2C是一种多主机、两线制、低速串行通信总线,广泛用于微控制器和各种外围设备之间的通信。它使用两条线路:串行数据线(SDA)和串行时钟线(SCL)进行双向传输。
核心特性:
-
两线制:I2C 通信只需两条线路:
- SDA(Serial Data Line):数据线,用于传输数据。
- SCL(Serial Clock Line):时钟线,由主设备控制,用于同步所有设备上的数据传输。
-
多主机和多从机:I2C 总线允许有多个主设备(可以发起通信)和多个从设备(响应主设备的请求)。这使得多个控制器可以管理不同的从设备,增加了系统的灵活性。
-
地址分配:每个 I2C 设备都通过一个唯一的地址进行识别。这些地址在设备通信时使用,确保数据包被正确发送到指定的设备。
-
简单的连接:由于通信线路数量少,I2C 设备通常易于安装和配置,减少了硬件布局的复杂性。
-
同步串行通信:数据传输是同步进行的,意味着数据传输由时钟信号控制,提高了数据传输的可靠性。
数据传输模式:
I2C 支持多种数据传输模式,包括标准模式(100kbps)、快速模式(400kbps)、快速模式加(1Mbps)和高速模式(3.4Mbps)。根据需要选择不同的速率,可以平衡通信速度和系统资源消耗。
应用场景:
I2C 协议在嵌入式系统中非常流行,适用于各种应用,如:
- 传感器读取:温度、湿度、压力等传感器经常通过 I2C 与微控制器通信。
- 设备控制:在许多小型设备或计算机系统中,如笔记本电脑,I2C 用于调节音量、亮度、电源管理等。
- 存储设备:某些类型的 EEPROM 和其他存储设备通过 I2C 接口与主控制器通信。
在普通单片机上的IIC通信可以简化为如下步骤
- SCL为高电平的时候,SDA由高电平变化到低电平,表示开始传输数据.
- SCL变低电平,SDA开始不断高低电平表示逻辑0和1来发送数据,共8次.
- SCL变高,从设备用SDA返回低电平0,则是ACK,表示发送成功,如果SDA是高电平1,则是NACK,表示没发送成功,
- SCL又变低电平,SDA继续发送数据.
- 当SCL变高电平的时候,SDA如果由低电平变高电平,则结束.
ArceOS的 I2C 驱动实现
MIO是一个包含多种控制器功能的多路选择控制器,飞腾派的每个MIO均可单独当做UART/I2C。端口功能的选择,可以通过配置creg_mio_func_sel寄存器来实现,配置为00选择I2C,配置为01选择UART。
由MIO控制器来当作IIC来与设备通信,操作会比普通单片机中用GPIO口模拟iic时序要复杂
由MIO控制的I2C操作说明:
1. 初始化
1.1 飞腾派I/O引脚初始化:
初始化I/Opad引脚寄存器,FIOPadConfig是一个配置实例,提供配置信息,包括其基地址和设备ID号,为MIO的初始化做铺垫,
代码由这里跳转
1.2 MIO控制器初始化
先对MIO进行初始化配置,包括功能寄存器地址,MIO寄存器地址以及中断编号
按照之前配置的I/Opad引脚寄存器,来设置 I2C 的 SCL 和 SDA 引脚功能。
设置MIO配置,包括 ID号、MIO基地址、中断号、频率、设备地址 和 传输速率。(这些由FMioLookupConfig来提供不同MIO的配置信息)
代码由这里跳转
1.3 初始化 I2C 配置
I2C配置中包含MIO配置,具体可以见结构体FI2c。首先检查设备是否已经初始化,防止重复初始化。如果设备没有初始化,它会进行去初始化操作,设置设备的配置数据,然后重置设备,最后将设备标记为已就绪状态
代码由这里跳转
最后返回到MIO控制器初始化中,初始化I2C设备中的中断函数
2. 收发数据
2.1 发送数据
代码跳转到这里
这个发送数据函数接收一个buffer用来装要发送的数据,由于是[u8],只有一个u8大小的值,所以buf_len也是1(这份数据只发一次,不重复发)。还接收一个inchip_offset,指从设备内部的偏地址
先通过FI2c对象来判断是否准备好,工作模式是否为主模式
然后启动I2C主设备传输,可以看这里FI2cMasterStartTrans
随后在FIFO不满的情况下,向0x10(IC_DATA_CMD)的bit[7:0]写数据,bit[8]写0表示写以外,向bit[9]写1表示停止。
2.2 接收数据
代码跳转到这里
和发送数据函数一样,接收数据函数接收一个buffer用来装接收到的u8大小的数据,以及buf_len,inchip_offset
先通过FI2c对象来判断是否准备好,工作模式是否为主模式
然后启动I2C主设备传输。
发送读数据命令:向0x10(IC_DATA_CMD)bit[8]写1,表示命令为读操作.
在FIFO不空的情况,读取数据,读最后一个字节数据时要加上停止信号,即除了向0x10(IC_DATA_CMD)的bit[8]仍写1表示读以外,向bit[9]写1表示停止。
最后停止I2C传输,见FI2cMasterStopTrans
I2C 寄存器:见飞腾派软件编程手册P292页
MIO寄存器基地址:
| Name | Offset |
|---|---|
| MIO0 | 0x000_2801_4000 |
| MIO1 | 0x000_2801_6000 |
| MIO2 | 0x000_2801_8000 |
| MIO3 | 0x000_2801_A000 |
| MIO4 | 0x000_2801_C000 |
| MIO5 | 0x000_2801_E000 |
| MIO6 | 0x000_2802_0000 |
| MIO7 | 0x000_2802_2000 |
| MIO8 | 0x000_2802_4000 |
| MIO9 | 0x000_2802_6000 |
| MIO10 | 0x000_2802_8000 |
| MIO11 | 0x000_2802_A000 |
| MIO12 | 0x000_2802_C000 |
| MIO13 | 0x000_2802_E000 |
| MIO14 | 0x000_2803_0000 |
| MIO15 | 0x000_2803_2000 |
飞腾小车这里选择的是MIO1作为接口
USB驱动代码导读
[TOC]
FAQ
- 仓库在哪里?
- 答:在这里,注意分支是usb-camera-base
前言-系统架构
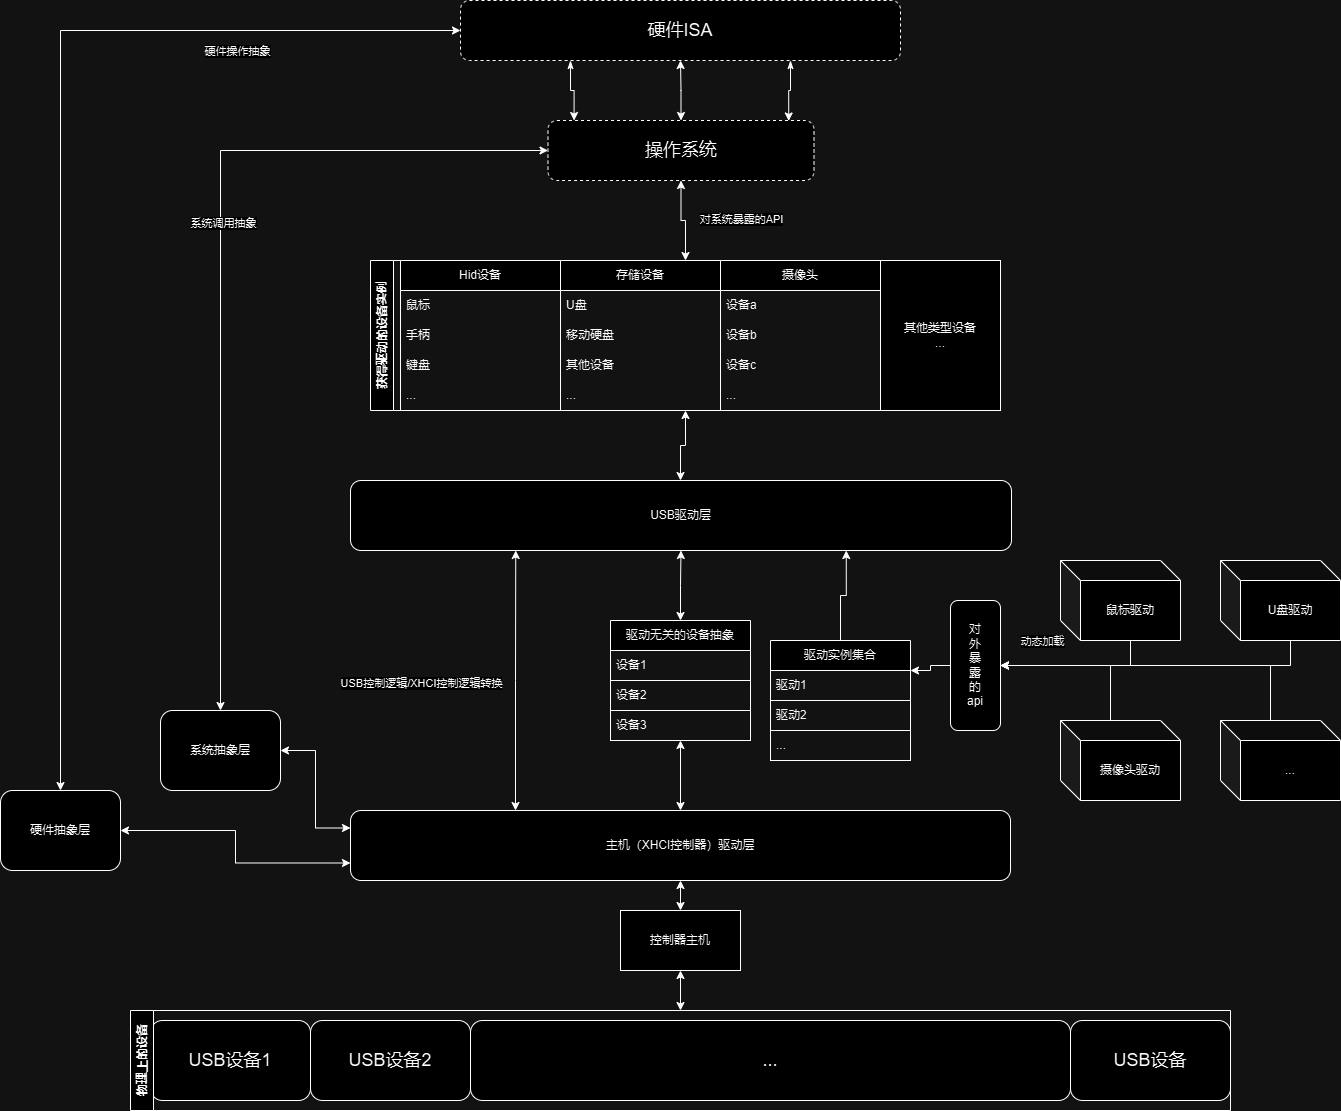
在这张图中,我们可以看到这些要点:
-
主机驱动层:usb系统发展至今,已经到了第四代了,目前市面上大多数usb主机控制器都是usb3.0主机控制器-xhci(eXtensible Host Controller Interface),由于其可扩展性,因此usb4也在使用它,在可预见的将来,xhci还会存在相当长一段时间,但这并不意味着我们就可以忽略过去的几种主机控制器-ehci/ohci/uhci,甚至是在虚拟化的环境下-vhci,因此,对于不同的主机,抽象出一套统一的接口上有必要的。
-
驱动无关的设备抽象:usb协议的上层建筑,各种驱动千变万化,但是它们都有着共同的操作对象,因此我们在这里将所有驱动都会用到的设备数据抽象出来,进一步的说,其内包含:
-
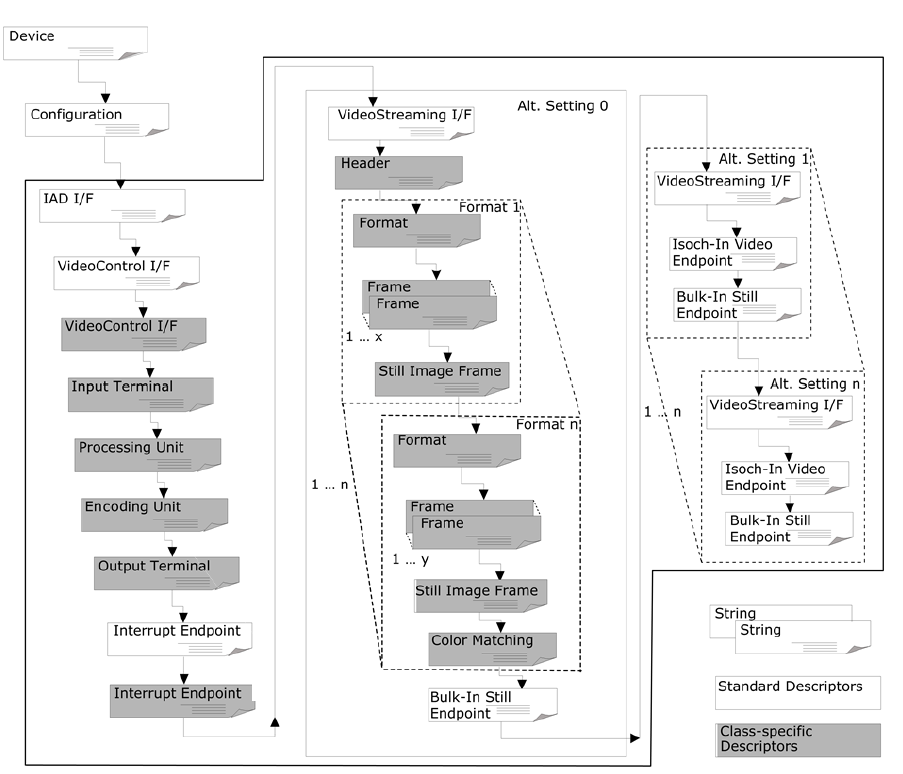
设备的描述符
-
设备的描述符通过控制传输从设备获取,由厂家定义,描述符为树形结构,其拓扑一般如下:
-
-
设备当前所使用的interface与config值与端点的概念
-
config-设备的配置-对应着上图中的配置描述符,有一个设备一次只能选择一个配置
-
interface-设备的功能,举个例子,无线鼠标接收器,在主机看来,其实往往是一个复合设备——他同时有鼠标/键盘/手柄的功能,每个功能都对应着一个接口描述符
-
endpoint-设备端点-对应着图中的端点描述符,“端点”在usb系统中,是主机与设备沟通的最小通道,端点本身也是一种状态机
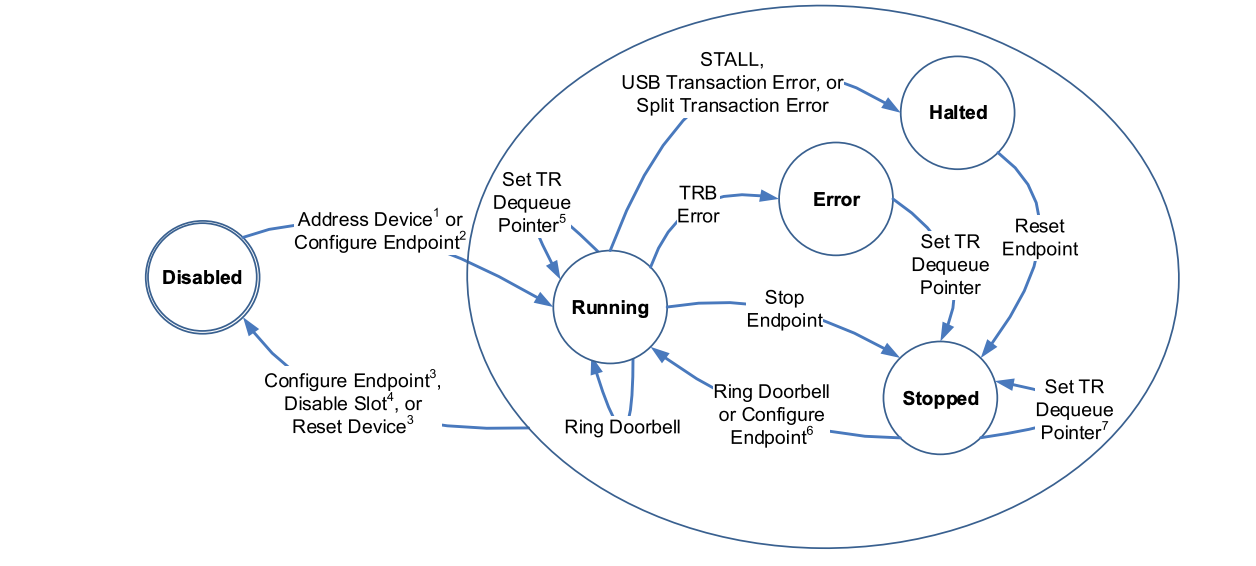
在初始状态下,除了永远保持开启的0号端点(控制端点),其余端点都处于未被配置的Disabled状态,当一个配置被选择时,主机需要根据这个配置下的所有端点描述符对对应的端点做初始化(确定端点的传输方式,传输间隔,传输大小等)。
-
-
设备的slot id-当设备被插入时,主机就会为设备分配一个唯一的slot id,这么做的原因是物理接口往往是可扩展的,因此用物理接口号来识别设备会造成混淆
-
-
USB驱动层:这一层则是对USB协议的封装,与主机控制器的内容并不相关,就像是其他的常见usb主机侧驱动一样(比如:linux,windows,circle os,redox...)它们都有一种叫做URB(USB Request Block)的结构体,其内记录了发起一次usb请求所需要的全部信息,这些信息在主机驱动层被解析为不同的主机控制器所对应的特定操作。而在我们的usb系统中,我们也设计了类似的结构:
-
URB:我们的系统中也具有URB的概念,但与其他的系统略有不同
-
模版匹配:得益于rust强大的模版匹配机制,我们并不需要像其他系统一样设计一个庞大的结构体:
#![allow(unused)]
fn main() {
//...
#[derive(Clone)]
pub struct URB<'a, O>
where
    O: PlatformAbstractions,
{
    pub device_slot_id: usize,
    pub operation: RequestedOperation<'a>,
    pub sender: Option<Arc<SpinNoIrq<dyn USBSystemDriverModuleInstance<'a, O>>>>,
}
//...
#[derive(Debug, Clone)]
pub enum RequestedOperation<'a> {
    Control(ControlTransfer),
    Bulk,
    Interrupt(InterruptTransfer),
    Isoch,
    ConfigureDevice(Configuration<'a>),
}

#[derive(Debug, Clone)]
pub struct ControlTransfer {
    pub request_type: bmRequestType,
    pub request: bRequest,
    pub index: u16,
    pub value: u16,
    pub data: Option<(usize, usize)>,
}
//...
}
* 注意到RequestOperation这个枚举类型,其对应了usb的四种传输(控制,中断,块,同步)以及一种额外的请求:设备配置(如,为设备分配地址,硬重置设备端口等),在实际使用中,这种模式这给予了我们不同往日的灵活。 -
UCB:这个结构体包含了URB所发起的事件的完成信息(完成状态,是否有错误,回报信息),与urb形成了对称,当URB的时间完成时,UCB将会被创建,并通过URB中的“sender”字段所保存的请求发起者的引用,回报给请求发起者(即被驱动创建的设备实例)
-
-
-
驱动api:可以在图中看到,我们的驱动部分是可扩展的,甚至可以动态的加载驱动模块,有着非常巧妙的设计:
-
首先,我们的驱动采用部分工厂模式+状态机的思想,其api定义如下:
#![allow(unused)] fn main() { pub trait USBSystemDriverModule<'a, O>: Send + Sync where O: PlatformAbstractions, { fn should_active( &self, independent_dev: &DriverIndependentDeviceInstance<O>, config: Arc<SpinNoIrq<USBSystemConfig<O>>>, ) -> Option<Vec<Arc<SpinNoIrq<dyn USBSystemDriverModuleInstance<'a, O>>>>>; fn preload_module(&self); } pub trait USBSystemDriverModuleInstance<'a, O>: Send + Sync where O: PlatformAbstractions, { fn prepare_for_drive(&mut self) -> Option<Vec<URB<'a, O>>>; fn gather_urb(&mut self) -> Option<URB<'a, O>>; fn receive_complete_event(&mut self, event: event::Allowed); } }-
USBSystemDriverModule:这是创建“驱动设备”的工厂,当有新设备被初始化完成时,usb层就会对每个驱动模块进行查询,当确定到有合适的驱动模块时,就会使对应的模块创建一个“驱动设备”的实例
-
USBSystemDriverModuleInstance:即上文所提到的“驱动设备”,该设备与下层的“驱动无关设备”并不耦合,具体的来说,驱动设备应当被设计为一种状态机,usb系统在开始运行后,就会在每个loop的通过轮询所有“驱动设备”的
gather_urb方法收集URB请求(根据驱动设备的状态,可能得到不同的,甚至干脆就没有URB,这些都是根据驱动设备的当前状态及其内部实现来决定的,我们称为-tick),在获取到了一大堆的URB后,就会将他们统一提交给主机控制器层,并等待任务完成后将UCB提交回驱动设备以改变驱动设备的状态(我们称为-tock) -
也就是说,在正常运行的前提下,我们整个usb系统都是在不断的进行"tick-tock",就像是时间轮一样:
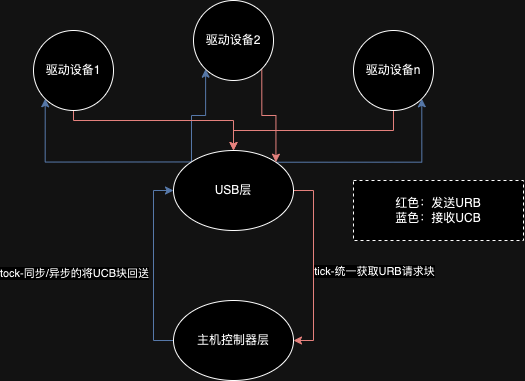
-
-
用一个表来描述Arceos的USB协议栈,如下表所示:
| 层级 | 功能 | 对应的目录 |
|---|---|---|
| USB驱动层 | HID, UVC, CDC等设备驱动的实现 | usb/drivers usb/transfer usb/operation usb/universal_drivers usb/urb.rs glue/ucb.rs |
| 设备抽象层 | 对不同的USB控制器抽象出统一的接口,对上层驱动提供统一的数据抽象 | abstractions/ usb/descriptors glue/driver_independent_device_instance.rs |
| 主机驱动层 | 是USB主机控制器的驱动 | host/ |
代码结构
.
├── abstractions
│   ├── dma.rs
│   └── mod.rs
├── err.rs
├── glue
│   ├── driver_independent_device_instance.rs
│   ├── glue_usb_host.rs
│   └── mod.rs
├── host
│   ├── data_structures
│   │   ├── host_controllers
│   │   │   ├── mod.rs
│   │   │   └── xhci
│   │   │       ├── context.rs
│   │   │       ├── event_ring.rs
│   │   │       ├── mod.rs
│   │   │       └── ring.rs
│   │   └── mod.rs
│   └── mod.rs
├── lib.rs
└── usb
    ├── descriptors
    │   ├── desc_configuration.rs
    │   ├── desc_device.rs
    │   ├── desc_endpoint.rs
    │   ├── desc_hid.rs
    │   ├── desc_interface.rs
    │   ├── desc_str.rs
    │   └── mod.rs
    ├── drivers
    │   ├── driverapi.rs
    │   └── mod.rs
    ├── mod.rs
    ├── operation
    │   └── mod.rs
    ├── trasnfer
    │   ├── control.rs
    │   ├── endpoints
    │   │   └── mod.rs
    │   ├── interrupt.rs
    │   └── mod.rs
    ├── universal_drivers
    │   ├── hid_drivers
    │   │   ├── hid_mouse.rs
    │   │   └── mod.rs
    │   └── mod.rs
    └── urb.rs
用驱动案例来解读:usb-hid鼠标驱动
让我们从一个usb-hid鼠标的实现开始,追踪他发出的单个URB的的生命周期,深入的看看代码到底是怎么样运行的
#![allow(unused)] fn main() { //... pub enum ReportDescState<O> //当前获取到的设备报告描述符,为了日后要编写的HID报文解析器的方便起见,我们在这里使用枚举类封装一次 where O: PlatformAbstractions, { Binary(SpinNoIrq<DMA<u8, O::DMA>>), Decoded(/*...待实现报文描述符解析器...*/), } //在以下的结构体中,我们需要注意的字段有这么几个 pub struct HidMouseDriver<O> //Hid鼠标-驱动设备实例-结构体 where O: PlatformAbstractions, { config: Arc<SpinNoIrq<USBSystemConfig<O>>>, bootable: usize, //bootable:hid协议特有的,bootable类型的设备会在bios中返回更丰富的数据 device_slot_id: usize, //这个字段从逻辑上将当前的“驱动设备”绑定到下层的“驱动无关设备” interrupt_in_channels: Vec<u32>, //中断输入端点集合,这部分由协议与设备的描述符共同决定,因此放在这里 interrupt_out_channels: Vec<u32>, //中断输出端点集合,这部分由协议与设备的描述符共同决定,因此放在这里 interface_value: usize, //interface配置值 interface_alternative_value: usize,//interface-子配置配置值 config_value: usize,//设备配置配置值 //以上三个配置值理论上应该是有Arc作为指针索引到驱动无关设备的相应字段, //但这么做开销略大,因此在本地保存一份复制 report_descriptor: Option<ReportDescState<O>>, /* 设备报告描述符-初始为None, 当获取到二进制值后转换为Some(ReportDescState::Binary(buffer)), 经过解析应当后转换为Some(ReportDescState::Decoded(descriptor)) */ driver_state_machine: HidMouseStateMachine, /* 这个驱动的重要组成部分-甚至可以说是核心:一个状态机 一共有两种状态:待发送和等待 */ receiption_buffer: Option<SpinNoIrq<DMA<[u8], O::DMA>>>, /* 数据缓冲区,见下文 */ } pub enum HidMouseStateMachine { //状态机从代码上实现为枚举类型 Waiting, //等待状态 Sending,//待发送 } impl<'a, O> HidMouseDriver<O> where O: PlatformAbstractions + 'static, { fn new_and_init( //驱动设备通过这个方法创建出来 device_slot_id: usize, bootable: u8, endpoints: Vec<Endpoint>, config: Arc<SpinNoIrq<USBSystemConfig<O>>>, interface_value: usize, alternative_val: usize, config_value: usize, ) -> Arc<SpinNoIrq<dyn USBSystemDriverModuleInstance<'a, O>>> { Arc::new(SpinNoIrq::new(Self { device_slot_id, interrupt_in_channels: { endpoints .iter() .filter_map(|ep| match ep.endpoint_type() { EndpointType::InterruptIn => Some(ep.doorbell_value_aka_dci()), _ => None, }) .collect() }, interrupt_out_channels: { endpoints .iter() .filter_map(|ep| match ep.endpoint_type() { EndpointType::InterruptOut => Some(ep.doorbell_value_aka_dci()), _ => None, }) .collect() }, config, interface_value, config_value, interface_alternative_value: alternative_val, bootable: bootable as usize, report_descriptor: None, driver_state_machine: HidMouseStateMachine::Sending, receiption_buffer: None, })) } } /* 为所有的 HidMouseDriver实现USBSystemDriverModuleInstance这个trait 以防读者不熟悉rust,特意说下,这里是rust的特殊之处,在rust中,并不存在面向对象 相反的,我们更倾向于面向数据:数据从何而来?到哪里去? 这种思想落实到这里,就是指trait-一种比接口更灵活的"行为模板",当一个结构体实现了某种trait 就意味着这个结构体实现了这种trait的所有特性。 在这里,USBSystemDriverModuleInstance-就是驱动设备应当有的行为的封装trait,其内包含三个方法: gather_urb:在每次tick时,usb系统从这里收集各个驱动设备所提交的urb receive_complete_event:在每次tock时,将urb的执行结果回传给这个方法,以改变状态机 prepare_for_drive:不同的驱动意味着不同的协议,不同的协议往往有着各自自定义的初始化操作 这个方法就是为了在正常工作前,进行不同协议所定义的设备初始化 */ impl<'a, O> USBSystemDriverModuleInstance<'a, O> for HidMouseDriver<O> where O: PlatformAbstractions, { fn gather_urb(&mut self) -> Option<Vec<crate::usb::urb::URB<'a, O>>> { match self.driver_state_machine { HidMouseStateMachine::Waiting => None, //如果当前的状态机为等待状态,那就不发出URB HidMouseStateMachine::Sending => { //如果当前的状态机为待发送状态,那么... self.driver_state_machine = HidMouseStateMachine::Waiting; //发送了URB后会转换为等待状态 match &self.receiption_buffer { Some(buffer) => buffer.lock().fill_with(|| 0u8), None => { self.receiption_buffer = Some(SpinNoIrq::new(DMA::new_vec( 0u8, 8, O::PAGE_SIZE, self.config.lock().os.dma_alloc(), ))) } } //如果数据交换buffer还没被创建,就创建一个,并将buffer清零 if let Some(buffer) = &mut self.receiption_buffer { trace!("some!"); return Some(vec![URB::<O>::new( self.device_slot_id, RequestedOperation::Interrupt(InterruptTransfer { endpoint_id: self.interrupt_in_channels.last().unwrap().clone() as usize, buffer_addr_len: buffer.lock().addr_len_tuple(), }), )]); //发送一次URB,这个URB包含一次中断传输请求,以及发起请求所需要的所有参数 } None } } } fn receive_complete_event(&mut self, ucb: UCB<O>) { //当收到UCB时 match ucb.code { crate::glue::ucb::CompleteCode::Event(TransferEventCompleteCode::Success) => { //如果收到的UCB表面传输完成 trace!("completed!"); self.receiption_buffer .as_ref() .map(|a| a.lock().to_vec().clone()) .inspect(|a| { trace!("current buffer:{:?}", a); //那就说明buffer里已经被填充了回报回来的数据,取出并打印 }); self.driver_state_machine = HidMouseStateMachine::Sending //并且将当前状态变回待发送,以待下次tick时继续发送中断传输请求 } other => panic!("received {:?}", other), //如果收到的UCB表明出现了错误,那么我们就让系统直接panic //这部分的处理看似过于粗暴,但实际上是合理的——经过初始化阶段的过滤,驱动必然找到了合适的设备 //也就是说这个驱动设备必定能正常工作,如果没有,那就说明是硬件的问题 //在这种情况下,软件无法做更多事,只能panic以发出警告 } } fn prepare_for_drive(&mut self) -> Option<Vec<URB<'a, O>>> { //一些hid所规定的特定操作,我们仅挑几处关键的位置讲解 trace!("hid mouse preparing for drive!"); let endpoint_in = self.interrupt_in_channels.last().unwrap(); let mut todo_list = Vec::new(); todo_list.push(URB::new( self.device_slot_id, RequestedOperation::Control(ControlTransfer { request_type: bmRequestType::new( Direction::Out, DataTransferType::Standard, Recipient::Device, ), request: bRequest::SetConfiguration, //设置设备的配置 index: self.interface_value as u16, value: self.config_value as u16, data: None, }), )); todo_list.push(URB::new( self.device_slot_id, RequestedOperation::Control(ControlTransfer { request_type: bmRequestType::new( Direction::Out, DataTransferType::Standard, Recipient::Interface, ), request: bRequest::SetInterfaceSpec, //设置设备的接口 index: self.interface_alternative_value as u16, value: self.interface_value as u16, data: None, }), )); if self.bootable > 0 { todo_list.push(URB::new( self.device_slot_id, RequestedOperation::Control(ControlTransfer { request_type: bmRequestType::new( Direction::Out, DataTransferType::Class, Recipient::Interface, ), request: bRequest::SetInterfaceSpec, //设置设备的协议-即关闭设备的boot模式 index: if self.bootable == 2 { 1 } else { 0 }, value: self.interface_value as u16, data: None, }), )); } self.report_descriptor = Some(ReportDescState::<O>::Binary(SpinNoIrq::new(DMA::new( 0u8, O::PAGE_SIZE, self.config.lock().os.dma_alloc(), )))); //初始化报文描述符的buffer-用于接收设备回报回来的描述信息 if let Some(ReportDescState::Binary(buf)) = &self.report_descriptor { todo_list.push(URB::new( self.device_slot_id, RequestedOperation::Control(ControlTransfer { request_type: bmRequestType::new( Direction::In, DataTransferType::Standard, Recipient::Interface, ), request: bRequest::GetDescriptor, //获取设备的报文描述符 index: self.interface_alternative_value as u16, value: DescriptorType::HIDReport.forLowBit(0).bits(), data: Some({ buf.lock().addr_len_tuple() }), //这里实际上产生了一个元组:(buffer地址,buffer长度) }), )); } self.interrupt_in_channels .iter() .chain(self.interrupt_out_channels.iter()) .for_each(|dci| { todo_list.push(URB::new( self.device_slot_id, RequestedOperation::ExtraStep(ExtraStep::PrepareForTransfer(*dci as _)), //通知主机准备进行传输,让主机层进行属于主机层的特定初始化操作 //这里仅仅是发出了通知,并无数据传输,工作的主体在主机层 )); }); Some(todo_list) } } pub struct HidMouseDriverModule; //驱动模块 //驱动模块和驱动设备有什么关系?当然是驱动模块会产生驱动设备 impl<'a, O> USBSystemDriverModule<'a, O> for HidMouseDriverModule where O: PlatformAbstractions + 'static, { fn should_active( //这个函数非常庞大,但其实质是在根据设备的描述符决定要不要启用当前模块 &self, independent_dev: &DriverIndependentDeviceInstance<O>, config: Arc<SpinNoIrq<USBSystemConfig<O>>>, ) -> Option<Vec<Arc<SpinNoIrq<dyn USBSystemDriverModuleInstance<'a, O>>>>> { if let MightBeInited::Inited(inited) = &independent_dev.descriptors { let device = inited.device.first().unwrap(); return match ( USBDeviceClassCode::from_u8(device.data.class), USBHidDeviceSubClassCode::from_u8(device.data.subclass), device.data.protocol, ) { ( Some(USBDeviceClassCode::HID), Some(USBHidDeviceSubClassCode::Mouse), bootable, ) => { return Some(vec![HidMouseDriver::new_and_init( independent_dev.slotid, bootable, { device .child .iter() .find(|c| { c.data.config_val() == independent_dev.configuration_val as u8 }) .expect("configuration not found") .child .iter() .filter_map(|func| match func { TopologicalUSBDescriptorFunction::InterfaceAssociation(_) => { panic!("a super complex device, help meeeeeeeee!"); } TopologicalUSBDescriptorFunction::Interface(interface) => Some( interface .iter() .find(|(interface, alternatives, endpoints)| { interface.interface_number == independent_dev.interface_val as u8 && interface.alternate_setting == independent_dev .current_alternative_interface_value as u8 }) .expect("invalid interface value or alternative value") .2 .clone(), ), }) .take(1) .flat_map(|a| a) .collect() }, config.clone(), independent_dev.interface_val, independent_dev.current_alternative_interface_value, independent_dev.configuration_val, )]); } (Some(USBDeviceClassCode::ReferInterfaceDescriptor), _, _) => Some({ let collect = device .child .iter() .find(|configuration| { configuration.data.config_val() == independent_dev.configuration_val as u8 }) .expect("configuration not found") .child .iter() .filter_map(|interface| match interface { TopologicalUSBDescriptorFunction::InterfaceAssociation(( asso, interfaces, )) if let ( USBDeviceClassCode::HID, USBHidDeviceSubClassCode::Mouse, bootable, ) = ( USBDeviceClassCode::from_u8(asso.function_class).unwrap(), USBHidDeviceSubClassCode::from_u8(asso.function_subclass).unwrap(), asso.function_protocol, ) => { // return Some(Self::new_and_init(independent_dev.slotid, bootable)); panic!("a super complex device, help meeeeeeeee!"); } TopologicalUSBDescriptorFunction::Interface(interfaces) => { let (interface, additional, endpoints) = interfaces .get(independent_dev.current_alternative_interface_value) .expect("invalid anternative interface value"); if let ( Some(USBDeviceClassCode::HID), Some(USBHidDeviceSubClassCode::Mouse), bootable, ) = ( USBDeviceClassCode::from_u8(interface.interface_class), USBHidDeviceSubClassCode::from_u8(interface.interface_subclass), interface.interface_protocol, ) { return Some(HidMouseDriver::new_and_init( independent_dev.slotid, bootable, endpoints.clone(), config.clone(), independent_dev.interface_val, independent_dev.current_alternative_interface_value, independent_dev.configuration_val, )); } else { None } } _ => None, }) .collect(); collect }), _ => None, }; } None } fn preload_module(&self) { //一些模块加载前会执行的操作-这个方法存在的目的是留给后来者进行二次开发的空间 trace!("preloading Hid mouse driver!") } } }
在我们的usb系统下,鼠标驱动的部分就这些,接下来让我们跟踪发出去的URB被处理的路径:
#![allow(unused)]
fn main() {
//...
    pub fn tick(&mut self) -> Vec<Vec<URB<'a, O>>> {
        self.driver_device_instances
//驱动设备实例集合-这个变量所代表集合保存了所有的驱动设备实例
            .iter()
            .filter_map(|drv_dev| {
                drv_dev
                .lock()
//是的,我们给这些驱动设备上了锁-我们是以异步+中断的编程模型来设计usb系统的
//但是由于设计的合理,我们也可以使用同步+轮询的运作方式
                .gather_urb()
//对每个驱动设备收集一次URB请求集合-一个驱动设备不一定只会提交一个URB
                .map(|mut vec| {
                    vec.iter_mut()
                        .for_each(|urb| urb.set_sender(drv_dev.clone()));
//一些额外的工作-为这些urb标注好请求发起者
                    vec
                })
            })
            .collect()
    }
//...
}
然后是tick-tock的核心:
#![allow(unused)]
fn main() {
    pub fn drive_all(mut self) -> Self {
        loop {
            let tick = self.usb_driver_layer.tick(); //usb层进行tick!
            if tick.len() != 0 { //如果没有设备发出请求,那就直接开始下一次tick
                trace!("tick! {:?}", tick.len());
                self.host_driver_layer.tock(tick); //主机层进行tock!
            }
        }
        self
    }
}
接下来看看tock
#![allow(unused)]
fn main() {
pub struct USBHostSystem<O>
where
    O: PlatformAbstractions,
{
    config: Arc<SpinNoIrq<USBSystemConfig<O>>>,
//主机层也会保存一份整个USB系统配置项的引用
    controller: ControllerArc<O>,
//主机层实际上只会包含一个主机-目前为止少有多xhci主机的硬件案例,但日后也可以轻易扩展
}

impl<O> USBHostSystem<O>
where
    O: PlatformAbstractions + 'static,
{
    pub fn new(config: Arc<SpinNoIrq<USBSystemConfig<O>>>) -> crate::err::Result<Self> {
//创建主机层的函数
        let controller = Arc::new(SpinNoIrq::new({
            let xhciregisters: Box<(dyn Controller<O> + 'static)> = {
                if cfg!(feature = "xhci") {
                    Box::new(XHCI::new(config.clone()))
                } else {
                    panic!("no host controller defined")
                }
            };
            xhciregisters
        }));
        Ok(Self { config, controller })
    }

    pub fn init(&self) {
//主机层的初始化函数
        self.controller.lock().init();
        trace!("controller init complete");
    }

    pub fn probe<F>(&self, consumer: F)
    where
        F: FnMut(DriverIndependentDeviceInstance<O>),
    {
//枚举所有连接上来的硬件设备,并为他们创建对应的驱动无关设备实例
        let mut probe = self.controller.lock().probe();
        probe
            .iter()
            .map(|slot_id| {
                DriverIndependentDeviceInstance::new(slot_id.clone(), self.controller.clone())
            })
            .for_each(consumer);
    }

    pub fn control_transfer(
        &mut self,
        dev_slot_id: usize,
        urb_req: ControlTransfer,
    ) -> crate::err::Result<UCB<O>> {
        self.controller
            .lock()
            .control_transfer(dev_slot_id, urb_req)
    }

    pub fn configure_device(
        &mut self,
        dev_slot_id: usize,
        urb_req: Configuration,
    ) -> crate::err::Result<UCB<O>> {
        self.controller
            .lock()
            .configure_device(dev_slot_id, urb_req)
    }

    pub fn urb_request(&mut self, request: URB<O>) -> crate::err::Result<UCB<O>> {
//urb分发-这部分将不同的urb分配给对应的的操作实现函数
        match request.operation {
            usb::urb::RequestedOperation::Control(control) => {
//控制传输-USB主协议所规定的,用于配置/读取usb设备的传输
                trace!("request transfer!");
                self.control_transfer(request.device_slot_id, control)
            }
            usb::urb::RequestedOperation::Bulk => todo!(),
//块传输-用于文件传输
            usb::urb::RequestedOperation::Interrupt(interrupt_transfer) => self
//中断传输-用于HID设备这类对同步性要求不高的任务
                .controller
                .lock()
                .interrupt_transfer(request.device_slot_id, interrupt_transfer),
            usb::urb::RequestedOperation::Isoch => todo!(),
//同步传输-用于usb摄像头这类要求高同步率的任务
            usb::urb::RequestedOperation::ConfigureDevice(configure) => self
//设备配置-进行设备配置相关的任务
                .controller
                .lock()
                .configure_device(request.device_slot_id, configure),
            usb::urb::RequestedOperation::ExtraStep(step) => self
//额外步骤-进行一些特殊任务
                .controller
                .lock()
                .extra_step(request.device_slot_id, step),
        }
    }

    pub fn tock(&mut self, todo_list_list: Vec<Vec<URB<O>>>) {
        trace!("tock! check deadlock!");
        todo_list_list.iter().for_each(|list| {
            list.iter().for_each(|todo| {
                if let Ok(ok) = self.urb_request(todo.clone())
                    && let Some(sender) = &todo.sender
                {
//发送一次URB请求并等待完成,如果有表明任务发起者
                    trace!("tock! check deadlock! 2");
                    sender.lock().receive_complete_event(ok);
//那就调用对应的发起者的完成函数
//这里可以很轻易的改成异步的方式-仅需要将urb_request改成async的就行!
                };
            })
        })
    }
}
}
接下来让我们看看主机层在xhci上的实现:
注意-这仅仅是单个文件的代码量
#![allow(unused)] fn main() { //... pub type RegistersBase = xhci::Registers<MemMapper>; pub type RegistersExtList = xhci::extended_capabilities::List<MemMapper>; pub type SupportedProtocol = XhciSupportedProtocol<MemMapper>; const TAG: &str = "[XHCI]"; #[derive(Clone)] pub struct MemMapper; impl Mapper for MemMapper { unsafe fn map(&mut self, phys_start: usize, bytes: usize) -> NonZeroUsize { return NonZeroUsize::new_unchecked(phys_start); } fn unmap(&mut self, virt_start: usize, bytes: usize) {} } //以上为一些常量及类型缩写的定义 pub struct XHCI<O> where O: PlatformAbstractions, { config: Arc<SpinNoIrq<USBSystemConfig<O>>>, pub regs: RegistersBase, pub ext_list: Option<RegistersExtList>, max_slots: u8, max_ports: u8, max_irqs: u16, scratchpad_buf_arr: Option<ScratchpadBufferArray<O>>, cmd: Ring<O>, event: EventRing<O>, pub dev_ctx: DeviceContextList<O>, }//xhci主机实例 impl<O> XHCI<O> //为xhci主机创建一些函数,读者暂时不用关心这些——这些都是操作硬件的实现细节 //如果读者对此感兴趣——我们在这里做的基本上就是将xhci规范第四章给完整实现了一遍 where O: PlatformAbstractions, { pub fn supported_protocol(&mut self, port: usize) -> Option<SupportedProtocol> { debug!("[XHCI] Find port {} protocol", port); if let Some(ext_list) = &mut self.ext_list { ext_list .into_iter() .filter_map(|one| { if let Ok(ExtendedCapability::XhciSupportedProtocol(protcol)) = one { return Some(protcol); } None }) .find(|p| { let head = p.header.read_volatile(); let port_range = head.compatible_port_offset() as usize ..head.compatible_port_count() as usize; port_range.contains(&port) }) } else { None } } fn chip_hardware_reset(&mut self) -> &mut Self { debug!("{TAG} Reset begin"); debug!("{TAG} Stop"); self.regs.operational.usbcmd.update_volatile(|c| { c.clear_run_stop(); }); debug!("{TAG} Until halt"); while !self.regs.operational.usbsts.read_volatile().hc_halted() {} debug!("{TAG} Halted"); let mut o = &mut self.regs.operational; // debug!("xhci stat: {:?}", o.usbsts.read_volatile()); debug!("{TAG} Wait for ready..."); while o.usbsts.read_volatile().controller_not_ready() {} debug!("{TAG} Ready"); o.usbcmd.update_volatile(|f| { f.set_host_controller_reset(); }); while o.usbcmd.read_volatile().host_controller_reset() {} debug!("{TAG} Reset HC"); while self .regs .operational .usbcmd .read_volatile() .host_controller_reset() || self .regs .operational .usbsts .read_volatile() .controller_not_ready() {} info!("{TAG} XCHI reset ok"); self } fn set_max_device_slots(&mut self) -> &mut Self { let max_slots = self.max_slots; debug!("{TAG} Setting enabled slots to {}.", max_slots); self.regs.operational.config.update_volatile(|r| { r.set_max_device_slots_enabled(max_slots); }); self } fn set_dcbaap(&mut self) -> &mut Self { let dcbaap = self.dev_ctx.dcbaap(); debug!("{TAG} Writing DCBAAP: {:X}", dcbaap); self.regs.operational.dcbaap.update_volatile(|r| { r.set(dcbaap as u64); }); self } fn set_cmd_ring(&mut self) -> &mut Self { let crcr = self.cmd.register(); let cycle = self.cmd.cycle; let regs = &mut self.regs; debug!("{TAG} Writing CRCR: {:X}", crcr); regs.operational.crcr.update_volatile(|r| { r.set_command_ring_pointer(crcr); if cycle { r.set_ring_cycle_state(); } else { r.clear_ring_cycle_state(); } }); self } fn start(&mut self) -> &mut Self { let regs = &mut self.regs; debug!("{TAG} Start run"); regs.operational.usbcmd.update_volatile(|r| { r.set_run_stop(); }); while regs.operational.usbsts.read_volatile().hc_halted() {} info!("{TAG} Is running"); regs.doorbell.update_volatile_at(0, |r| { r.set_doorbell_stream_id(0); r.set_doorbell_target(0); }); self } fn init_ir(&mut self) -> &mut Self { debug!("{TAG} Disable interrupts"); let regs = &mut self.regs; regs.operational.usbcmd.update_volatile(|r| { r.clear_interrupter_enable(); }); let mut ir0 = regs.interrupter_register_set.interrupter_mut(0); { debug!("{TAG} Writing ERSTZ"); ir0.erstsz.update_volatile(|r| r.set(1)); let erdp = self.event.erdp(); debug!("{TAG} Writing ERDP: {:X}", erdp); ir0.erdp.update_volatile(|r| { r.set_event_ring_dequeue_pointer(erdp); }); let erstba = self.event.erstba(); debug!("{TAG} Writing ERSTBA: {:X}", erstba); ir0.erstba.update_volatile(|r| { r.set(erstba); }); ir0.imod.update_volatile(|im| { im.set_interrupt_moderation_interval(0); im.set_interrupt_moderation_counter(0); }); debug!("{TAG} Enabling primary interrupter."); ir0.iman.update_volatile(|im| { im.set_interrupt_enable(); }); } // }; // self.setup_scratchpads(buf_count); self } fn get_speed(&self, port: usize) -> u8 { self.regs .port_register_set .read_volatile_at(port) .portsc .port_speed() } fn parse_default_max_packet_size_from_port(&self, port: usize) -> u16 { match self.get_speed(port) { 1 | 3 => 64, 2 => 8, 4 => 512, v => unimplemented!("PSI: {}", v), } } fn reset_cic(&mut self) -> &mut Self { let regs = &mut self.regs; let cic = regs .capability .hccparams2 .read_volatile() .configuration_information_capability(); regs.operational.config.update_volatile(|r| { if cic { r.set_configuration_information_enable(); } else { r.clear_configuration_information_enable(); } }); self } fn reset_ports(&mut self) -> &mut Self { let regs = &mut self.regs; let port_len = regs.port_register_set.len(); for i in 0..port_len { debug!("{TAG} Port {} start reset", i,); regs.port_register_set.update_volatile_at(i, |port| { port.portsc.set_0_port_enabled_disabled(); port.portsc.set_port_reset(); }); while regs .port_register_set .read_volatile_at(i) .portsc .port_reset() {} debug!("{TAG} Port {} reset ok", i); } self } fn setup_scratchpads(&mut self) -> &mut Self { let scratchpad_buf_arr = { let buf_count = { let count = self .regs .capability .hcsparams2 .read_volatile() .max_scratchpad_buffers(); debug!("{TAG} Scratch buf count: {}", count); count }; if buf_count == 0 { error!("buf count=0,is it a error?"); return self; } let scratchpad_buf_arr = ScratchpadBufferArray::new(buf_count, self.config.lock().os.clone()); self.dev_ctx.dcbaa[0] = scratchpad_buf_arr.register() as u64; debug!( "{TAG} Setting up {} scratchpads, at {:#0x}", buf_count, scratchpad_buf_arr.register() ); scratchpad_buf_arr }; self.scratchpad_buf_arr = Some(scratchpad_buf_arr); self } fn test_cmd(&mut self) -> &mut Self { //TODO:assert like this in runtime if build with debug mode? debug!("{TAG} Test command ring"); for _ in 0..3 { let completion = self .post_cmd(command::Allowed::Noop(command::Noop::new())) .unwrap(); } debug!("{TAG} Command ring ok"); self } fn post_cmd(&mut self, mut trb: command::Allowed) -> crate::err::Result<CommandCompletion> { let addr = self.cmd.enque_command(trb); self.regs.doorbell.update_volatile_at(0, |r| { r.set_doorbell_stream_id(0); r.set_doorbell_target(0); }); fence(Ordering::Release); let r = self.event_busy_wait_cmd(addr as _)?; /// update erdp self.regs .interrupter_register_set .interrupter_mut(0) .erdp .update_volatile(|f| { f.set_event_ring_dequeue_pointer(self.event.erdp()); }); Ok(r) } fn event_busy_wait_cmd(&mut self, addr: u64) -> crate::err::Result<CommandCompletion> { debug!("Wait result"); loop { if let Some((event, cycle)) = self.event.next() { match event { event::Allowed::CommandCompletion(c) => { let mut code = CompletionCode::Invalid; if let Ok(c) = c.completion_code() { code = c; } else { continue; } trace!( "[CMD] << {code:#?} @{:X} got result, cycle {}", c.command_trb_pointer(), c.cycle_bit() ); if c.command_trb_pointer() != addr { continue; } if let CompletionCode::Success = code { return Ok(c); } return Err(Error::CMD(code)); } _ => warn!("event: {:?}", event), } } } } fn trace_dump_context(&self, slot_id: usize) { let dev = &self.dev_ctx.device_out_context_list[slot_id]; trace!( "slot {} {:?}", slot_id, DeviceHandler::slot(&**dev).slot_state() ); for i in 1..32 { if let EndpointState::Disabled = dev.endpoint(i).endpoint_state() { continue; } trace!(" ep dci {}: {:?}", i, dev.endpoint(i).endpoint_state()); } } fn append_port_to_route_string(route_string: u32, port_id: usize) -> u32 { let mut route_string = route_string; for tier in 0..5 { if route_string & (0x0f << (tier * 4)) == 0 { if tier < 5 { route_string |= (port_id as u32) << (tier * 4); return route_string; } } } route_string } fn ep_ring_mut(&mut self, device_slot_id: usize, dci: u8) -> &mut Ring<O> { trace!("fetch transfer ring at slot{}-dci{}", device_slot_id, dci); &mut self.dev_ctx.transfer_rings[device_slot_id][dci as usize - 1] } fn update_erdp(&mut self) { self.regs .interrupter_register_set .interrupter_mut(0) .erdp .update_volatile(|f| { f.set_event_ring_dequeue_pointer(self.event.erdp()); }); } fn event_busy_wait_transfer(&mut self, addr: u64) -> crate::err::Result<event::TransferEvent> { trace!("Wait result @{addr:#X}"); loop { // sleep(Duration::from_millis(2)); if let Some((event, cycle)) = self.event.next() { self.update_erdp(); match event { event::Allowed::TransferEvent(c) => { let code = c.completion_code().unwrap(); trace!( "[Transfer] << {code:#?} @{:#X} got result{}, cycle {}, len {}", c.trb_pointer(), code as usize, c.cycle_bit(), c.trb_transfer_length() ); // if c.trb_pointer() != addr { // debug!(" @{:#X} != @{:#X}", c.trb_pointer(), addr); // // return Err(Error::Pip); // continue; // } trace!("code:{:?},pointer:{:x}", code, c.trb_pointer()); if CompletionCode::Success == code || CompletionCode::ShortPacket == code { return Ok(c); } debug!("error!"); return Err(Error::CMD(code)); } _ => warn!("event: {:?}", event), } } } } fn setup_device( &mut self, device_slot_id: usize, configure: &TopologicalUSBDescriptorConfiguration, ) -> crate::err::Result<UCB<O>> { configure.child.iter().for_each(|func| match func { crate::usb::descriptors::TopologicalUSBDescriptorFunction::InterfaceAssociation(_) => { todo!() } crate::usb::descriptors::TopologicalUSBDescriptorFunction::Interface(interfaces) => { let (interface0, attributes, endpoints) = interfaces.first().unwrap(); let input_addr = { { let input = self.dev_ctx.device_input_context_list[device_slot_id].deref_mut(); { let control_mut = input.control_mut(); control_mut.set_add_context_flag(0); control_mut.set_configuration_value(configure.data.config_val()); control_mut.set_interface_number(interface0.interface_number); control_mut.set_alternate_setting(interface0.alternate_setting); } let entries = endpoints .iter() .map(|endpoint| endpoint.doorbell_value_aka_dci()) .max() .unwrap_or(1); input .device_mut() .slot_mut() .set_context_entries(entries as u8); } // debug!("endpoints:{:#?}", interface.endpoints); for ep in endpoints { let dci = ep.doorbell_value_aka_dci() as usize; let max_packet_size = ep.max_packet_size; let ring_addr = self.ep_ring_mut(device_slot_id, dci as _).register(); let input = self.dev_ctx.device_input_context_list[device_slot_id].deref_mut(); let control_mut = input.control_mut(); debug!("init ep {} {:?}", dci, ep.endpoint_type()); control_mut.set_add_context_flag(dci); let ep_mut = input.device_mut().endpoint_mut(dci); ep_mut.set_interval(3); ep_mut.set_endpoint_type(ep.endpoint_type()); ep_mut.set_tr_dequeue_pointer(ring_addr); ep_mut.set_max_packet_size(max_packet_size); ep_mut.set_error_count(3); ep_mut.set_dequeue_cycle_state(); let endpoint_type = ep.endpoint_type(); match endpoint_type { EndpointType::Control => {} EndpointType::BulkOut | EndpointType::BulkIn => { ep_mut.set_max_burst_size(0); ep_mut.set_max_primary_streams(0); } EndpointType::IsochOut | EndpointType::IsochIn | EndpointType::InterruptOut | EndpointType::InterruptIn => { //init for isoch/interrupt ep_mut.set_max_packet_size(max_packet_size & 0x7ff); //refer xhci page 162 ep_mut.set_max_burst_size( ((max_packet_size & 0x1800) >> 11).try_into().unwrap(), ); ep_mut.set_mult(0); //always 0 for interrupt if let EndpointType::IsochOut | EndpointType::IsochIn = endpoint_type { ep_mut.set_error_count(0); } ep_mut.set_tr_dequeue_pointer(ring_addr); ep_mut.set_max_endpoint_service_time_interval_payload_low(4); //best guess? } EndpointType::NotValid => { unreachable!("Not Valid Endpoint should not exist.") } } } let input = self.dev_ctx.device_input_context_list[device_slot_id].deref_mut(); (input as *const Input<16>).addr() as u64 }; let command_completion = self .post_cmd(command::Allowed::ConfigureEndpoint( *command::ConfigureEndpoint::default() .set_slot_id(device_slot_id as _) .set_input_context_pointer(input_addr), )) .unwrap(); self.trace_dump_context(device_slot_id); match command_completion.completion_code() { Ok(ok) => match ok { CompletionCode::Success => { UCB::<O>::new(CompleteCode::Event(TransferEventCompleteCode::Success)) } other => panic!("err:{:?}", other), }, Err(err) => { UCB::new(CompleteCode::Event(TransferEventCompleteCode::Unknown(err))) } }; } }); //TODO: Improve Ok(UCB::new(CompleteCode::Event( TransferEventCompleteCode::Success, ))) } fn prepare_transfer_normal(&mut self, device_slot_id: usize, dci: u8) { //in our code , the init state of transfer ring always has ccs = 0, so we use ccs =1 to fill transfer ring let mut normal = transfer::Normal::default(); normal.set_cycle_bit(); let ring = self.ep_ring_mut(device_slot_id, dci); ring.enque_trbs(vec![normal.into_raw(); 31]) //the 32 is link trb } } impl<O> Controller<O> for XHCI<O> //这里是重点-为XHCI实现一个主机控制器应该有的行为 where O: PlatformAbstractions, { fn new(config: Arc<SpinNoIrq<USBSystemConfig<O>>>) -> Self //主机控制器的创建 where Self: Sized, { let mmio_base = config.lock().base_addr.clone().into(); unsafe { let regs = RegistersBase::new(mmio_base, MemMapper); let ext_list = RegistersExtList::new(mmio_base, regs.capability.hccparams1.read(), MemMapper); // let version = self.core_mut().regs.capability.hciversion.read_volatile(); // info!("xhci version: {:x}", version.get()); let hcsp1 = regs.capability.hcsparams1.read_volatile(); let max_slots = hcsp1.number_of_device_slots(); let max_ports = hcsp1.number_of_ports(); let max_irqs = hcsp1.number_of_interrupts(); let page_size = regs.operational.pagesize.read_volatile().get(); debug!( "{TAG} Max_slots: {}, max_ports: {}, max_irqs: {}, page size: {}", max_slots, max_ports, max_irqs, page_size ); let dev_ctx = DeviceContextList::new(max_slots, config.clone()); // Create the command ring with 4096 / 16 (TRB size) entries, so that it uses all of the // DMA allocation (which is at least a 4k page). let entries_per_page = O::PAGE_SIZE / mem::size_of::<ring::TrbData>(); let cmd = Ring::new(config.lock().os.clone(), entries_per_page, true).unwrap(); let event = EventRing::new(config.lock().os.clone()).unwrap(); debug!("{TAG} ring size {}", cmd.len()); Self { regs, ext_list, config: config.clone(), max_slots: max_slots, max_ports: max_ports, max_irqs: max_irqs, scratchpad_buf_arr: None, cmd: cmd, event: event, dev_ctx: dev_ctx, } } } fn init(&mut self) { //主机控制器的初始化-链式调用很爽,这里都是xhci的特定操作 //顺序遵循XHCI规范的第四章的要求。 self.chip_hardware_reset() .set_max_device_slots() .set_dcbaap() .set_cmd_ring() .init_ir() .setup_scratchpads() .start() .test_cmd() .reset_ports(); } fn probe(&mut self) -> Vec<usize> { //设备枚举 let mut founded = Vec::new(); //此方法最终会返回这个Vec<usize>,其中存放了所有找到的已连接设备的slot id { let mut port_id_list = Vec::new(); let port_len = self.regs.port_register_set.len(); for i in 0..port_len { let portsc = &self.regs.port_register_set.read_volatile_at(i).portsc; info!( "{TAG} Port {}: Enabled: {}, Connected: {}, Speed {}, Power {}", i, portsc.port_enabled_disabled(), portsc.current_connect_status(), portsc.port_speed(), portsc.port_power() ); if !portsc.port_enabled_disabled() { continue; } port_id_list.push(i); //初步检查物理port是否有产生供电信号-这标志着接口上有设备,这部分标志位的更新由xhci硬件实现 } for port_idx in port_id_list { //为所有已连接的设备做初始化,包括: let port_id = port_idx + 1; //↓ let slot_id = self.device_slot_assignment(); //向xhci申请slot id self.dev_ctx.new_slot(slot_id as usize, 0, port_id, 32); //为设备绑定slot debug!("assign complete!"); //↓ self.address_device(slot_id, port_id); //为设备分配地址 self.trace_dump_context(slot_id); //↓ let packet_size0 = self.control_fetch_control_point_packet_size(slot_id); trace!("packet_size0: {}", packet_size0); //↓ self.set_ep0_packet_size(slot_id, packet_size0 as _); //配置好控制端点 founded.push(slot_id) } } founded } //以下则是对于不同的urb请求的具体实现,感兴趣的读者请自行查阅 fn control_transfer( &mut self, dev_slot_id: usize, urb_req: ControlTransfer, ) -> crate::err::Result<UCB<O>> { let direction = urb_req.request_type.direction.clone(); let buffer = urb_req.data; let mut len = 0; let data = if let Some((addr, length)) = buffer { let mut data = transfer::DataStage::default(); len = length; data.set_data_buffer_pointer(addr as u64) .set_trb_transfer_length(len as _) .set_direction(direction); Some(data) } else { None }; let setup = *transfer::SetupStage::default() .set_request_type(urb_req.request_type.into()) .set_request(urb_req.request as u8) .set_value(urb_req.value) .set_index(urb_req.index) .set_transfer_type({ if buffer.is_some() { match direction { Direction::In => TransferType::In, Direction::Out => TransferType::Out, } } else { TransferType::No } }) .set_length(len as u16); trace!("{:#?}", setup); let mut status = *transfer::StatusStage::default().set_interrupt_on_completion(); //=====post!======= let mut trbs: Vec<transfer::Allowed> = Vec::new(); trbs.push(setup.into()); if let Some(data) = data { trbs.push(data.into()); } trbs.push(status.into()); let mut trb_pointers = Vec::new(); { let ring = self.ep_ring_mut(dev_slot_id, 1); for trb in trbs { trb_pointers.push(ring.enque_transfer(trb)); } } if trb_pointers.len() == 2 { trace!( "[Transfer] >> setup@{:#X}, status@{:#X}", trb_pointers[0], trb_pointers[1] ); } else { trace!( "[Transfer] >> setup@{:#X}, data@{:#X}, status@{:#X}", trb_pointers[0], trb_pointers[1], trb_pointers[2] ); } fence(Ordering::Release); self.regs.doorbell.update_volatile_at(dev_slot_id, |r| { r.set_doorbell_target(1); }); let complete = self .event_busy_wait_transfer(*trb_pointers.last().unwrap() as _) .unwrap(); match complete.completion_code() { Ok(complete) => match complete { CompletionCode::Success => Ok(UCB::new(CompleteCode::Event( TransferEventCompleteCode::Success, ))), err => panic!("{:?}", err), }, Err(fail) => Ok(UCB::new(CompleteCode::Event( TransferEventCompleteCode::Unknown(fail), ))), } } fn configure_device( &mut self, dev_slot_id: usize, urb_req: Configuration, ) -> crate::err::Result<UCB<O>> { match urb_req { Configuration::SetupDevice(config) => self.setup_device(dev_slot_id, &config), Configuration::SwitchInterface(_, _) => todo!(), } } fn device_slot_assignment(&mut self) -> usize { // enable slot let result = self .post_cmd(command::Allowed::EnableSlot( *command::EnableSlot::default().set_slot_type({ { // TODO: PCI未初始化,读不出来 // let mut regs = self.regs.lock(); // match regs.supported_protocol(port) { // Some(p) => p.header.read_volatile().protocol_slot_type(), // None => { // warn!( // "{TAG} Failed to find supported protocol information for port {}", // port // ); // 0 // } // } 0 } }), )) .unwrap(); let slot_id = result.slot_id(); trace!("assigned slot id: {slot_id}"); slot_id as usize } fn address_device(&mut self, slot_id: usize, port_id: usize) { let port_idx = port_id - 1; let port_speed = self.get_speed(port_idx); let max_packet_size = self.parse_default_max_packet_size_from_port(port_idx); let dci = 1; let transfer_ring_0_addr = self.ep_ring_mut(slot_id, dci).register(); let ring_cycle_bit = self.ep_ring_mut(slot_id, dci).cycle; let context_addr = { let context_mut = self .dev_ctx .device_input_context_list .get_mut(slot_id) .unwrap() .deref_mut(); let control_context = context_mut.control_mut(); control_context.set_add_context_flag(0); control_context.set_add_context_flag(1); for i in 2..32 { control_context.clear_drop_context_flag(i); } let slot_context = context_mut.device_mut().slot_mut(); slot_context.clear_multi_tt(); slot_context.clear_hub(); slot_context.set_route_string(Self::append_port_to_route_string(0, port_id)); // for now, not support more hub ,so hardcode as 0.//TODO: generate route string slot_context.set_context_entries(1); slot_context.set_max_exit_latency(0); slot_context.set_root_hub_port_number(port_id as _); //todo: to use port number slot_context.set_number_of_ports(0); slot_context.set_parent_hub_slot_id(0); slot_context.set_tt_think_time(0); slot_context.set_interrupter_target(0); slot_context.set_speed(port_speed); let endpoint_0 = context_mut.device_mut().endpoint_mut(dci as _); endpoint_0.set_endpoint_type(xhci::context::EndpointType::Control); endpoint_0.set_max_packet_size(max_packet_size); endpoint_0.set_max_burst_size(0); endpoint_0.set_error_count(3); endpoint_0.set_tr_dequeue_pointer(transfer_ring_0_addr); if ring_cycle_bit { endpoint_0.set_dequeue_cycle_state(); } else { endpoint_0.clear_dequeue_cycle_state(); } endpoint_0.set_interval(0); endpoint_0.set_max_primary_streams(0); endpoint_0.set_mult(0); endpoint_0.set_error_count(3); (context_mut as *const Input<16>).addr() as u64 }; fence(Ordering::Release); let result = self .post_cmd(command::Allowed::AddressDevice( *command::AddressDevice::new() .set_slot_id(slot_id as _) .set_input_context_pointer(context_addr), )) .unwrap(); trace!("address slot [{}] ok", slot_id); } fn control_fetch_control_point_packet_size(&mut self, slot_id: usize) -> u8 { trace!("control_fetch_control_point_packet_size"); let mut buffer = DMA::new_vec(0u8, 8, 64, self.config.lock().os.dma_alloc()); self.control_transfer( slot_id, ControlTransfer { request_type: bmRequestType::new( Direction::In, DataTransferType::Standard, trasnfer::control::Recipient::Device, ), request: bRequest::GetDescriptor, index: 0, value: DescriptorType::Device.forLowBit(0).bits(), data: Some((buffer.addr() as usize, buffer.length_for_bytes())), }, ) .unwrap(); let mut data = [0u8; 8]; data[..8].copy_from_slice(&buffer); trace!("got {:?}", data); data.last() .and_then(|len| Some(if *len == 0 { 8u8 } else { *len })) .unwrap() } fn set_ep0_packet_size(&mut self, dev_slot_id: usize, max_packet_size: u16) { let addr = { let input = self.dev_ctx.device_input_context_list[dev_slot_id as usize].deref_mut(); input .device_mut() .endpoint_mut(1) //dci=1: endpoint 0 .set_max_packet_size(max_packet_size); debug!( "CMD: evaluating context for set endpoint0 packet size {}", max_packet_size ); (input as *mut Input<16>).addr() as u64 }; self.post_cmd(command::Allowed::EvaluateContext( *command::EvaluateContext::default() .set_slot_id(dev_slot_id as _) .set_input_context_pointer(addr), )) .unwrap(); } fn interrupt_transfer( &mut self, dev_slot_id: usize, urb_req: trasnfer::interrupt::InterruptTransfer, ) -> crate::err::Result<UCB<O>> { let (addr, len) = urb_req.buffer_addr_len; self.ep_ring_mut(dev_slot_id, urb_req.endpoint_id as _) .enque_transfer(transfer::Allowed::Normal( *Normal::new() .set_data_buffer_pointer(addr as _) .set_trb_transfer_length(len as _) .set_interrupter_target(0) .set_interrupt_on_short_packet() .set_interrupt_on_completion(), )); self.regs.doorbell.update_volatile_at(dev_slot_id, |r| { r.set_doorbell_target(urb_req.endpoint_id as _); }); let transfer_event = self.event_busy_wait_transfer(addr as _).unwrap(); match transfer_event.completion_code() { Ok(complete) => match complete { CompletionCode::Success | CompletionCode::ShortPacket => { trace!("ok! return a success ucb!"); Ok(UCB::new(CompleteCode::Event( TransferEventCompleteCode::Success, ))) } err => panic!("{:?}", err), }, Err(fail) => Ok(UCB::new(CompleteCode::Event( TransferEventCompleteCode::Unknown(fail), ))), } } fn extra_step(&mut self, dev_slot_id: usize, urb_req: ExtraStep) -> crate::err::Result<UCB<O>> { match urb_req { ExtraStep::PrepareForTransfer(dci) => { if dci > 1 { self.prepare_transfer_normal(dev_slot_id, dci as u8); Ok(UCB::<O>::new(CompleteCode::Event( TransferEventCompleteCode::Success, ))) } else { Err(Error::DontDoThatOnControlPipe) } } } } } }
后话
这仅仅是我们所做的工作量的冰山一角,在以上导读中,仅仅是在追踪一个URB的生命周期,甚至依然还隐藏掉了许多的工程细节,限于篇幅有限不可展开细说,欢迎感兴趣的读者自行翻阅代码理解。
作业
- 请大家先跑通现有代码,跑通的标志是-当鼠标状态改变时,产生了输出(即出现got report: [...]这样的输出)
- 请以Trace级别的日志输出来编译代码,以获取更详细的输出以方便debug
- 运行步骤请参考案例复现文档
- 可以注意到,我们目前还没有完成报文解析这一步,缺少了报文解析,就意味着我们即使从HID设备拿到了回报数据,也无法得知变动的各个位到底意味着什么,请大家完善这部分代码。接下来是一个报文解析的样例:
报文是如何被解析的?
- 报表描述符以Input字段做分隔,UseagePage表述当前段描述的内容,举个例子,这是我们做实验时用到的鼠标的报表描述符:
  Interface 0 HID Report Descriptor Mouse

  Item Tag (Value) Raw Data                                   //左边是解读结果,右侧hex值为实际上拿到手的原始数据
  Usage Page (Generic Desktop) 05 01
  Usage (Mouse) 09 02
  Collection (Application) A1 01
      Usage (Pointer) 09 01  //Pointer-鼠标指针
      Collection (Physical) A1 00
          Usage Page (Button) 05 09                           //Button-这一块描述的是按键的解析方式
          Usage Minimum (Button 1) 19 01                      //最多可包含16个按钮,至少包含一个按钮
          Usage Maximum (Button 16) 29 10                         //按钮次序按位排列,就约定来说,一般约定bit0是左键,bit1是右键,bit2是中键
          Logical Minimum (0) 15 00                           //逻辑上的最小值-对应的位为0表示没有被按下
          Logical Maximum (1) 25 01                           //逻辑上的最大值-对应的位为1表示按钮被按下
          Report Count (16) 95 10                             //报告数量——重复16次——也就是一共有16个这样的按钮
          Report Size (1) 75 01                               //报告大小-1bit,16个报告*1bit=16位-即这个Page所描述的信息占用了报文的2个字节
          Input (Data,Var,Abs,NWrp,Lin,Pref,NNul,Bit) 81 02
          Usage Page (Generic Desktop) 05 01                  //Generic Desktop-这里描述的是鼠标指针运动的解析方式
          Logical Minimum (-32767) 16 01 80                   //最小值为-32767
          Logical Maximum (32767) 26 FF 7F                    //最大值为 32767
          Report Size (16) 75 10                              //单个报告大小-16bit
          Report Count (2) 95 02                              //重复两次
          Usage (X) 09 30                                     //首先第一次是X方向的运动量
          Usage (Y) 09 31                                     //然后第二次是Y方向的运动量
          //综上得知,这一页描述的是鼠标运动,有XY两个方向,每个方向的运动量范围为从-32767到32767,为i16大小(两个字节),两个方向加起来-两个i16,即占用了报文的4个字节
          Input (Data,Var,Rel,NWrp,Lin,Pref,NNul,Bit) 81 06
          Logical Minimum (-127) 15 81                        //最小值为-127
          Logical Maximum (127) 25 7F                         //最大值为127
          Report Size (8) 75 08                               //占用8个bit大小
          Report Count (1) 95 01                              //不重复,只有一次
          Usage (Wheel) 09 38                                 //哦,原来是描述了鼠标滚轮啊!  ——所以Usage并不一定要出现在开头
          Input (Data,Var,Rel,NWrp,Lin,Pref,NNul,Bit) 81 06
          Usage Page (Consumer Devices) 05 0C
          Usage (AC Pan) 0A 38 02                             //AC Pan,查阅相关规范得知,这是鼠标上的那个用于改变回报率的小按钮,可以暂时忽略
          Report Count (1) 95 01
          Input (Data,Var,Rel,NWrp,Lin,Pref,NNul,Bit) 81 06
      End Collection C0
  End Collection C0
项目阶段一:USB设备驱动
项目阶段一:UVC摄像头驱动
我们的第一个目标是实现一个UVC摄像头的驱动
什么是UVC摄像头?
UVC,全称为:USB video(device) class,是微软与另外几家设备厂商联合推出的为USB视频捕获设备定义的协议标准,目前已成为USB org标准之一。
USB协议中,除了通用的软硬件电气接口规范等,还包含了各种各样的Class协议,用来为不同的功能定义各自的标准接口和具体的总线上的数据交互格式和内容。这些Class协议的数量非常多,最常见的比如支持U盘功能的Mass Storage Class,以及通用的数据交换协议:CDC class。此外还包括Video、Audio Class, Print Class等等。正是由于这些Class协议,大大促进了USB设备的普及,比如说各个厂商生产的U盘都能通过操作系统自带的驱动程序来使用。
首先-资料去哪找?
- 我们提供的资料包里有UVC规范的文档
- 想看中文资料的,可以去USB中文网找找
- linux的开源驱动-可以作为参考
我们目前手头有什么?
- 可以看到,UVC的描述符布局略显复杂,幸运的是,我们已经有了一套完整(?)的设备描述符解析机制。
- 我们已经有了一套USB驱动框架作为基础,并提供了一定的抽象以减轻思维负担,不需要从0开始写
我们还缺什么
- 不幸的是,上文所说的描述符解析机制可能存在一些bug,但目前为止表现一直很良好
- UVC同时需要使用到所有的四种传输方式
- 不幸的是,截止这篇文档编写完成前,我们只写了控制传输和中断传输的部分
- 不过其实剩下的两个写起来也不难
- 不幸的是,截止这篇文档编写完成前,我们只写了控制传输和中断传输的部分
进展日志
摄像头相关应用程序开发
项目阶段二:颜色识别
Linux上运行 Python3
各大Linux发行版都自带python,这里简单介绍Ubuntu 22.04(24.04)运行 python3.
也可以自己安装升级:
- 安装(此步骤可以省略) 在终端中输入以下命令来安装 Python:
sudo apt update
sudo apt install python3
- 安装 pip(Python 包管理工具) 安装 pip 以便于安装和管理 Python 包:
sudo apt install python3-pip
- 使用pip3 安装python库,例如安装numpy
pip3 install numpy
- 测试numpy是否安装成功
chenlongos@chenlongos-LAPKC71E:~$ python3
Python 3.12.3 (main, Jul 31 2024, 17:43:48) [GCC 13.2.0] on linux
Type "help", "copyright", "credits" or "license" for more information.
>>> import numpy
>>>
- 运行一个python文件
python3 hello.py
在PC上安装运行 opencv
在 Ubuntu 上安装和运行 OpenCV
更新系统包
首先,确保你的系统包是最新的:
sudo apt update
sudo apt upgrade
安装依赖项
安装 OpenCV 所需的依赖项:
sudo apt install build-essential cmake git pkg-config libgtk-3-dev \
libavcodec-dev libavformat-dev libswscale-dev libv4l-dev \
libxvidcore-dev libx264-dev libjpeg-dev libpng-dev libtiff-dev \
gfortran openexr libatlas-base-dev python3-dev python3-numpy \
libtbb2 libtbb-dev libdc1394-22-dev
下载 OpenCV 源码
从 OpenCV 官方网站下载源码:
cd ~
git clone https://github.com/opencv/opencv.git
git clone https://github.com/opencv/opencv_contrib.git
编译和安装 OpenCV
创建一个构建目录并使用 CMake 配置 OpenCV 构建:
cd ~/opencv
mkdir build
cd build
cmake -D CMAKE_BUILD_TYPE=RELEASE \
-D CMAKE_INSTALL_PREFIX=/usr/local \
-D OPENCV_EXTRA_MODULES_PATH=~/opencv_contrib/modules \
-D BUILD_EXAMPLES=ON ..
make -j16
安装 OpenCV:
sudo make install
sudo ldconfig
运行一个简单的 OpenCV 程序
创建一个简单的 Python 脚本来测试 OpenCV:
import cv2
print("OpenCV version:", cv2.__version__)
img = cv2.imread('test_image.jpg')
cv2.imshow('Test Image', img)
cv2.waitKey(0)
cv2.destroyAllWindows()
通过蓝色来获取小球的位置
import cv2
import numpy as np

# 读取图像
image = cv2.imread('car.jpeg')

# 将图像从 BGR 转换为 HSV
hsv = cv2.cvtColor(image, cv2.COLOR_BGR2HSV)

# 定义蓝色的 HSV 范围
lower_blue = np.array([90, 110, 110])
upper_blue = np.array([124, 255, 255])

# 创建蓝色的掩膜
mask = cv2.inRange(hsv, lower_blue, upper_blue)

# 进行形态学操作(可选)
mask = cv2.erode(mask, None, iterations=2)
mask = cv2.dilate(mask, None, iterations=2)

# 找到轮廓
contours, _ = cv2.findContours(mask.copy(), cv2.RETR_EXTERNAL, cv2.CHAIN_APPROX_SIMPLE)

# 绘制轮廓
for contour in contours:
    if cv2.contourArea(contour) > 1400:  # 过滤掉小面积的轮廓
        (x, y, w, h) = cv2.boundingRect(contour)
        cv2.rectangle(image, (x, y), (x + w, y + h), (0, 255, 0), 2)

# 显示结果
cv2.imshow('Detected Blue Ball', image)
cv2.waitKey(0)
import time
time.sleep(10)
cv2.destroyAllWindows()
基于ArceOS 的Python3.11 版本
-
仓库地址 https://github.com/luodeb/starry
-
clone 源代码到本地
-
从README中 我们优先下载 https://musl.cc/aarch64-linux-musl-cross.tgz
解压缩后,将 aarch64-linux-musl-cross/bin 添加到PATH里面
检测编译器是否存在:
aarch64-linux-musl-gcc
- 建立img
./build_pyimg.sh
执行前 检查系统是否有python3.11可执行文件
- 运行
./run.sh
自己动手支持python12
在原代码支持python11版本基础上如何支持python12?
- 修改 build_pyimg.sh脚本
路径
PYTHON_BIN_PATH="python-lab/opt/python3.12/bin/python3.12"
磁盘空间,因为python12编译后空间较大,所以修改空间。
dd if=/dev/zero of=disk.img bs=4M count=80
- 修改ramdisk 空间配置,支持大disk
磁盘空间变大后,对应的ArceOS的 配置需要修改,修改下面文件 starry ls apk/Python-3.12.4.tgz
*** 注意:同时 删除或者移除 原有Python-3.11.8.tgz到其他路径 ***

4. 修改 build.sh编译脚本

starry/python-lab$ vim build.sh
VER=python3.12
本机器PC Linux上必须有 python3.12可执行文件,
才能编译成功aarch的ArceOS上可以执行的版本。

5. 编译
./build_pyimg.sh
6. 运行
./run.sh
在ArceOS上运行 OpenCV
- 下载编译
下载,操作请注意路径
starry/python-lab/build$ git clone https://github.com/opencv/opencv.git --depth 1
- 编译环境 Ubuntu 24.04( 22.04 应该也可以) 请下载好 aarch64-linux-musl-cross,并设置好可以执行路径
https://musl.cc/aarch64-linux-musl-cross.tgz
解压缩后,将 aarch64-linux-musl-cross/bin 添加到PATH里面
输入 下面命令检查 编译器路径是否设置成功:
aarch64-linux-musl-gcc
安装 cmake,make
sudo aptitude install cmake make
- 建立编译脚本文件
starry/python-lab/build/opencv$ touch aarch64_musl.cmake
内容如下:
# CMakeToolchainFile.cmake
cmake_minimum_required(VERSION 3.16)
# 设置目标系统
set(CMAKE_SYSTEM_NAME Generic)
set(CMAKE_SYSTEM_PROCESSOR aarch64)
# 定义工具链前缀
set(CMAKE_AR aarch64-linux-musl-ar)
set(CMAKE_RANLIB aarch64-linux-musl-ranlib)
set(CMAKE_NM aarch64-linux-musl-nm)
set(CMAKE_STRIP aarch64-linux-musl-strip)
set(CMAKE_OBJCOPY aarch64-linux-musl-objcopy)
set(CMAKE_SIZE aarch64-linux-musl-size)
set(CMAKE_C_COMPILER aarch64-linux-musl-gcc)
set(CMAKE_CXX_COMPILER aarch64-linux-musl-g++)
set(CMAKE_ASM_COMPILER aarch64-linux-musl-gcc)
# 设置编译器标志
set(CMAKE_C_FLAGS "${CMAKE_C_FLAGS} -Wall -Werror")
set(CMAKE_CXX_FLAGS "${CMAKE_CXX_FLAGS} -Wall -Werror")
set(CMAKE_ASM_FLAGS "${CMAKE_ASM_FLAGS} -Wall -Werror")
# 设置链接器静态编译标志
set(CMAKE_EXE_LINKER_FLAGS "${CMAKE_EXE_LINKER_FLAGS} -static")
# 设置 CMake 寻找库文件的路径
set(CMAKE_FIND_ROOT_PATH "/home/debin/toolchain/aarch64-linux-muslcross/aarch64-linux-musl")
# 配置 CMake 如何查找库文件
set(CMAKE_FIND_ROOT_PATH_MODE_PROGRAM NEVER) # 不搜索宿主系统的程序
set(CMAKE_FIND_ROOT_PATH_MODE_LIBRARY ONLY) # 只搜索 sysroot
set(CMAKE_FIND_ROOT_PATH_MODE_INCLUDE ONLY) # 只搜索 sysroot
set(CMAKE_FIND_ROOT_PATH_MODE_PACKAGE ONLY) # 只搜索 sysroot
# 设置 CMake sysroot路径
set(CMAKE_SYSROOT "/home/debin/toolchain/aarch64-linux-muslcross/aarch64-linux-musl")
set(CMAKE_FIND_ROOT_PATH "${CMAKE_SYSROOT}")
建立 build和install目录
starry/python-lab/build/opencv$ mkdir build install
生成编译环境:
starry/python-lab/build/opencv/build$ cmake -DCMAKE_TOOLCHAIN_FILE=../aarch64_musl.cmake -DBUILD_SHARED_LIBS=OFF -DINSTALL_TESTS=ON -DOPENCV_ENABLE_NONFREE=ON ..
编译
make -j16
整体框架
作业:形状识别
手势识别
- 安装 相关识别包 mediapipe
python3 -m pip install mediapipe
此命令类似pip3 install mediapipe
- 参考代码
import cv2
import mediapipe as mp

# 初始化手部检测模型
mp_hands = mp.solutions.hands
hands = mp_hands.Hands()
mp_draw = mp.solutions.drawing_utils

# 捕捉视频帧
cap = cv2.VideoCapture(0)
while True:
    success, img = cap.read()
    if not success:
        break

    # 将图像从BGR转换为RGB
    img_rgb = cv2.cvtColor(img, cv2.COLOR_BGR2RGB)

    # 处理图像,检测手部
    results = hands.process(img_rgb)

    # 绘制手部关键点
    if results.multi_hand_landmarks:
        for hand_landmarks in results.multi_hand_landmarks:
            mp_draw.draw_landmarks(img, hand_landmarks, mp_hands.HAND_CONNECTIONS)

    # 显示结果
    cv2.imshow("Image", img)
    if cv2.waitKey(1) & 0xFF == ord('q'):
        break

cap.release()
cv2.destroyAllWindows()
- 效果如下:

车道识别
这里先采用车道识别的方式来实现自动驾驶
- 安装相关包: sudo apt install python3-numpy python3-matplotlib
- 参考代码
import sys
import cv2
import matplotlib.pyplot as plt
import numpy as np

img = cv2.imread('road.png')

## 图像灰度化处理
gray_img = cv2.cvtColor(img, cv2.COLOR_BGR2GRAY)


## 图像二值化处理
# ret, dst = cv2.threshold(src, thresh, maxval, type[, dst])
# 参数:
#   src:    源图像, 必须是单通道灰度图像
#   thresh: 阈值
#   maxval: 二值化操作中使用的最大值, 通常设为255
#   type:   二值化方法
#   dst:    (可选)目标图像, 用于存储二值化结果
# 返回值:
#   ret:    返回的阈值, 对于自动阈值方法(如cv2.THRESH_OTSU), 返回计算得到的阈值
#   dst:    二值化后的图像
thresh, binary_img = cv2.threshold(gray_img, 200, 255, cv2.THRESH_BINARY)

## 图像边缘检测
# edges = cv2.Canny(image, threshold1, threshold2[, apertureSize[, L2gradient]])
# 参数:
#   image:      输入图像, 通常是8位灰度图像
#   threshold1: 第一个阈值, 边缘梯度值高于这个阈值的像素被视为边缘
#   threshold2: 第二个阈值, 在这两个阈值之间的边缘会被认为是强边缘
#                       而低于threshold1但高于threshold2的边缘被认为是弱边缘
#                       只有与强边缘相连的弱边缘才会被认为是真正的边缘
# 返回值:
#   edges:      边缘图像
output = cv2.Canny(binary_img, 180, 255)

## 掩码操作
# cv2.fillPoly(img, pts, color[, lineType[, shift[, offset]]])
# 参数:
#       img:   原图像
#       pts:   多边形的顶点坐标列表, 其中每个元素是一个二维坐标点(即顶点的坐标)
#       color: 填充颜色
def mask_of_image(image):
    polygons = np.array([[ (0, image.shape[0]),
                           (image.shape[1]//2, 100),
                           (image.shape[1], image.shape[0]) ]])
    mask = np.zeros_like(image)
    cv2.fillPoly(mask, polygons, 255)
    masked_image = cv2.bitwise_and(image, mask)
    return masked_image

mask_img = mask_of_image(output)

img = cv2.imread('road.png')

## 霍夫线变换, 检测直线
# cv2.HoughLinesP(image, rho, theta, threshold, lines=None, minLineLength=None, maxLineGap=None)
# 参数:
#  image:通过边缘检测(如 Canny 边缘检测)处理后的图像
#  rho  :ρ 的步长(分辨率), ρ 是从原点到直线的垂直距离(以像素为单位)
#  theta: θ 的步长(分辨率), θ 是直线的角度(以弧度为单位)
#  threshold:累加器阈值, 只有那些累加器值大于阈值的直线才会被返回
#                 这个值越高, 检测到的直线就越强
lines = cv2.HoughLinesP(mask_img, 1, np.pi/180, 5)

for line in lines:
    x1, y1, x2, y2 = line[0]
    ## 车道线标注
    # cv2.line(img, tuple(line[0]), tuple(line[1]), color,thickness)
    # 参数:
    #   img   :    所标注的目标图片
    #   line[0]:   起点坐标
    #   line[1]:   终点坐标
    #   color:     颜色
    #   thickness: 线宽
    cv2.line(img, (x1, y1), (x2, y2), (0, 255, 0), 4)

plt.imshow(img)
plt.show()
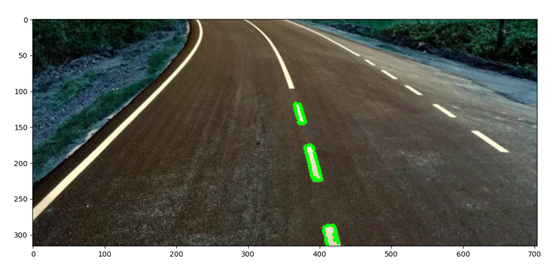
效果如下
原图

处理后
关于识别
最初方案 OpenCV
原方案是使用OpenCV通过图像处理根据阈值转换成黑白的二值图,并通过一些降噪及处理使图像更平滑,最终根据像素大小超过临界大小的的最大连通图是否是符合一个比较圆的区域来判断是否是网球。
# 预处理 - 高斯模糊减少噪声
blurred_img = cv2.GaussianBlur(frame, (5, 5), 0)
# 中值滤波进一步减少噪声
median_blur = cv2.medianBlur(blurred_img, 5)
# 转换为 HSV 颜色空间
hsv = cv2.cvtColor(median_blur, cv2.COLOR_BGR2HSV)
# 创建颜色掩膜
mask = cv2.inRange(hsv, self.lower, self.upper)
# 形态学操作(消除噪声)
# 定义结构元素(核),例如 5x5 的矩形
kernel = cv2.getStructuringElement(cv2.MORPH_RECT, (5, 5))
# 开运算,先腐蚀再膨胀,用于去除小的噪点
mask = cv2.morphologyEx(mask, cv2.MORPH_OPEN, kernel, iterations=1)
ma=mask
# 闭运算,先膨胀再腐蚀,用于填充孔洞
mask = cv2.morphologyEx(mask, cv2.MORPH_CLOSE, kernel, iterations=3)
mask = cv2.morphologyEx(mask, cv2.MORPH_OPEN, kernel, iterations=2)
mask = cv2.GaussianBlur(mask, (5, 5), 0)
# 查找轮廓
contours, _ = cv2.findContours(mask, cv2.RETR_EXTERNAL, cv2.CHAIN_APPROX_SIMPLE)
# 轮询处理每个轮廓
for cnt in contours:
    # 计算是圆形的概率
    circularity = 4 * np.pi * area / (perimeter * perimeter)
    # 要检测区域的像素大小要在临界大小内,且圆形率要大于0.8
    if area > min_area and area < max_area and circularity > 0.8:
        # 认为是网球,则进行后面的处理
问题1及解决
-
存在的问题01-识别不准确
这种方式必然存在着很大的误识别率,鲁棒性比较差,比如如果周围环境有绿色植物,颜色刚好在处理的阈值内,也就会被处理成白色,如果形状接近圆形,就会被识别为网球,实际测试时候确实出现过这种问题。另外网球在不同环境光下也会导致颜色有差异,因此不同光下可能也存在识别不到的情况。

下面这张是上图的处理后的二值图像,可以看到为了降噪和平滑的处理,反而让一些不大不小的孔变成了圆形,并且因为图像处理中涉及到填充,会使这些在临界大小附近的孔变大进而超过临界大小,因此将这些区域识别成网球。

-
改进方案01-换YOLO
改进方案将OpenCV图像处理改成YOLO模型推理识别,这种方案不需要考虑复杂的图像处理,只需要采集照片标注,并进行训练,最终训练得到的模型即可用于识别。YOLO是一个开源项目,目前已经迭代了好多版本,关于训练的代码及识别的代码都在开源仓库中有,因此不需要再进行过多开发。
问题2及解决
-
存在问题02-OpenCV获取的图像有滞后
因为使用了YOLO去识别图像,会导致两次读取摄像头图像的时间间隔比较大,在飞腾派上大约是900ms,而因为OpenCV的特性是使用了缓冲区,提前读入摄像头的图像并存入缓冲区,在两次读取时间间隔过长时,缓冲区中会存入多张图像,这会导致后面读取的图像还是之前位置拍摄的,并不是实时的,因此会出现滞后。
-
改进方案02-使用多线程单独管理摄像头
网上查阅的结果应该是也可以改变缓冲区大小,或者在读一次图像之前先多次读取图片直到将缓冲区读取完。但是这两种方式仍然是在主线程中运行,考虑到读取摄像头如果在主线程的话也会延长两次识别的时间间隔,因此可以使用多线程优化摄像头读取。
单独开一个线程,以一个较短的时间间隔去读取摄像头,并将最新画面存入一个缓冲区,主线程读取识别图像只从这个缓冲区读取,并不直接调用摄像头。
import threading
import time

class CapThread(threading.Thread):   #继承父类threading.Thread
    def __init__(self):
        # 父类初始化
        threading.Thread.__init__(self)

        # 用于储存最新图像的缓冲区
        self.frame=None

        # 用于结束运行的标志位
        self.runFlag=True

    # 对外获取最新图像的调用函数
    def getFrame(self):
        return self.frame

    # 对外用于停止运行的调用函数
    def stop_run(self):
        self.runFlag=False

    # 父类的方法,线程要执行的代码放在这个函数中
    def run(self):
        # 可以指定线程固定使用的核心
        # 但是因为是线程,所以使用的核心是和主进程一样的
        # 因此这里指定使用的核心用处不大
        # p=psutil.Process(os.getpid())
        # p.cpu_affinity([0])
        cap = cv2.VideoCapture(0)
        # 指定摄像头获取到的图像的长宽大小
        cap.set(cv2.CAP_PROP_FRAME_WIDTH, 640) # 长
        cap.set(cv2.CAP_PROP_FRAME_HEIGHT, 480) # 宽
        # 在飞腾派上直接读取摄像头时候会因为速度过慢报一个错误
        # 网上查阅后需要将读取的格式转换一下,就是以下的代码
        cap.set(cv2.CAP_PROP_FOURCC, cv2.VideoWriter_fourcc('M','J','P','G'))
        if not cap.isOpened():
            print("无法打开摄像头")
            exit()
        while self.runFlag:
            # 读取摄像头画面,ret为bool类型,表示是否成功,frame为Numpy
            ret, frame = cap.read()

            # 翻转图像,跟摄像头实际安装有关,flip中第二个参数表示翻转方式
            # 1:水平翻转,即可理解为数学上关于x轴对称
            # 0:垂直翻转,即可理解为数学上关于y轴对称
            # -1:水平垂直翻转,即可理解为数学上关于原点对称
            self.frame = cv2.flip(frame, -1)

            # 这里判断非None不能直接用=,因为Numpy的性质会直接不进行判断,并报错
            # 因此要判断非None需要使用is
            # 并且要通过cv2.imshow现实图像只能在这里使用
            # 因为根据cv2的要求显示画面要和获取图像在同一个线程中,因此不能在主线程显示
            if self.frame is not None:
                cv2.imshow('frame',self.frame)

            # 如果摄像头读取图像失败会停止运行
            if not ret:
                self.runFlag = False

            # 休眠一会再进行下次读取,time.sleep的单位是秒,可以用小数来精确到毫秒
            time.sleep(0.050)

            # 与cv2.imshow同理,这个函数也只能和读取摄像头在同一个进程中使用
            if cv2.waitKey(1) & 0xFF == ord("q"):
                self.runFlag=False
                break
按照如上的代码定义一个新的线程,并在主线程中开启这个线程,之后就可以通过
getFrame()获取到最新的图像了。# 生成一个线程对象 cap = CapThread() # 开启线程 cap.start() # 摄像头的开启可能需要一点时间 # 为了防止后面开始识别时候缓冲区是空 # 这里先阻塞一会,直到缓冲区不为None再继续执行 while cap.getFrame() is None: time.sleep(0.05) # 之后就可以通过cap.getFrame()正常获取图像了经过测试,上面的代码可以获取到实时的图像,并且在识别的时间上会稍微快一点。
问题3及解决
-
存在问题03-识别耗时太长
这个方案中存在的问题就是YOLO执行速度较慢,在电脑端测的时候还感受不出来,但是在飞腾派开发板测试时候差距比较明显。不算模型记载时间,如果电脑端识别一张图片用时90ms左右时,则在飞腾派识别一张图片要用时900ms左右。这个延迟已经严重影响到飞腾派对小车进行实时控制了,例如在0ms时上一张图片识别结果出来,对小车发送控制指令并拍摄新图片进行识别,900ms后新图片识别结果出来,对小车发出新的控制指令,但是这个指令对应的状态应该是900ms前的状态,900ms后小车可能已经移动到了新的位置,因此再执行这个指令就不准确了,表现就是小车在一个球前一直左右摇摆。
-
改进方案03
-
降低小车移动速度
这就是比较简单的适配飞腾派识别速度的方案,但是实际测试下来效果并不理想,速度太慢时候有的轮子可能会转不动,并且测试不同速度也并不能适配YOLO的识别速度,因此这个方案不可行。
-
换香橙派开发板
香橙派开发板具有NPU,并且四个核的性能也比飞腾派要高,飞腾派也是四核,但是是两个大核两个小核,性能并不是很好。换用香橙派之后,在并未启用NPU时候识别速度可以达到500ms左右,但是接上小车之后,这个速度还是有点慢,依然存在小车左右摇摆的情况。
Orange Pi AIpro(20T)硬件规格参数
飞腾派 硬件规格书 模块规格 -
多进程调度优化
主要思路是根据开发板有的CPU核心数开启多个子进程,每个进程强制使用不同的核心,这样进程的推理不会互相抢占核心。这样可以用调度程序来干预进程之间识别的时间间隔,假如进程1和进程2之间开始识别相差200ms,且识别一张图片速度是一样的,这样就可以得到进程1识别结果后的200ms就可以得到进程2的识别结果,就可以让前后两次识别的时间间隔控制在
200ms。先说结论,还是存在问题,假如说识别一张图的时间是500ms,那么得到第一张图的结果是在拍摄之后的500ms,因此就算图与图之间的识别间隔缩短了,但是得到这张图对应的结果及小车的控制指令还是在500ms之后,所以实验下来依然存在左右摇摆的情况。
下面是关于多进程调度的开发过程
多进程的开发目前先在飞腾派上做实验。
首先在使用多进程前,需要先看一下在没有强制一个进程使用一个核的时候,每个核的使用率情况。因为开发板是
Linux系统,因此可以使用htop命令查看CPU核心情况。
这是
htop指令的界面,下面是正在运行的进程信息,最上面几行标有“0”、“1”,“2”,“3”的就是CPU核心的使用率,下面还有内存的使用率“Mem”。可以看到没运行程序的时候使用率还是比较低的。下面这张就是还没有强制进程使用固定核心的使用率。

从使用率可以看到,进程是四个核都使用了,因为是只有一个进程,所以使用率还没有占满,从旁边的运行时间可以看到大约是900ms识别一张图。
接着测试一下只是用一个核心的使用率及识别速度。这里可以使用
python的psutil库。pip install psutilimport os import psutil # 强制进程使用的cpu核心 # 通过pid获取操作进程的权柄 p=psutil.Process(os.getpid()) # 指定进程可以使用的CPU核心序号 p.cpu_affinity([0])下面是使用0号核心的使用率及识别速度。

下面是使用1号核心的使用率及识别速度。

下面是使用2号核心的使用率及识别速度。

下面是使用3号核心的使用率及识别速度。
可以看到单用一个核心的情况下,使用率都是拉满的。但是值得注意的是,在2、3核心上的识别时间要比0、1核心上的识别时间短。这就说明2、3核心是所谓的大核,而0、1核心是小核。大小核性能差距还是比较大的,大核上时间大约是1.6秒,小核上时间大约是4秒。
以上是CPU核心的测试结果,下面开始开发多进程的使用及调度。
需要用到
multiprocessing库,这个库在Python3.4以上版本是自带的,因此无需安装。import multiprocessing def func(): print('多进程开启') p=multiprocessing.Process(target=func, args=()) p.start()多进程的开启方法和线程不太一样,不需要继承库中的类,而是需要直接写好一个函数,在
multiprocessing.Process方法中传入这个函数及需要的参数,target即函数名;args是需要的参数,类型是元组类型。因此只需要把YOLO识别部分的代码写到一个函数中就可以了。但是这个时候还涉及到一个问题,怎么传入需要识别的图像,首先想到的是在外部定义一个全局变量,然后主进程获取到图像后直接赋值给这个变量,子进程就在函数内直接访问。下面是一个例子,先说结论,这是错误的。
frame = None
data = None
def detect():
    global frame
    global data
    # 先假定下面这个函数是封装的YOLO识别函数
    data = process_img(frame)

# 先使用上面说到的多线程获取摄像头图像的方法来获取最新图像
frame = cap.getFrame()
p = multiprocessing.Process(target = detect, args = ())
p.start()
报错原因是进程与进程之间无法共享内存,查阅了一下找到了
multiprocessing库提供进程间共享数据的方法。import multiprocessing # 创建一个管理器对象,该对象可以创建能在多个进程间共享的列表和字典 manger=multiprocessing.Manager() # 创建一个共享的字典对象 shared_dict = manger.dict() # 初始化两个需要用到的元素 shared_dict['frame'] = None shared_dict['data'] = None # 但是还是不能直接在进程的函数中直接使用这个对象,需要通过函数的参数传入 def detect(sd): # 先假定下面这个函数是封装的YOLO识别函数 sd['data'] = process_img(sd['frame']) # 使用前面定义过的管理摄像头的线程获取当前图像 frame = cap.getFrame() p = multiprocessing.Process(target = detect, args = (shared_dict)) p.start()测试以上代码后,是可以正常运行的。那么下面就可以开始开发多进程代码了。
def detect(sd, process_id, cpu_core):
    # 这里有必要说一下为什么在这里才引用识别的库
    # 因为识别的库process.py是自己写的,所以是在项目的目录下存放的
    # 之前也和其他库一样放在开头,但是运行到这报错,大概意思也是多进程无法调用
    # 因此把这个自己的库就放到了多进程中去引用,相当于每个进程都需要引用一次
    from src.process import process_img

    # 强制当前进程使用固定的CPU核心
    process=psutil.Process(os.getpid())
    process.cpu_affinity([cpu_core])

    print('start')
    # 共享字典中的run元素是布尔类型,用来标志是否需要结束
    # 方便主进程优雅的结束子进程
    while sd['run']:
    # 在共享字典中根据每个进程的id储存图像帧,如sd['frame0']
        # 因为每个元素初始化时候为None,为防止主进程还没有加载好摄像头
        # 因此这里用循环判断去等待元素不为None
        while sd['frame'+str(process_id)] is None:
            # 等待一段时间,防止访问过快
            time.sleep(0.009)
        frame = sd['frame'+str(process_id)]

        # 将当前子进程对应的帧在共享字典中清空
        # 用于子进程判断下一帧是不是新的,对应前面那个while循环
        sd['frame'+str(process_id)] = None

        # 如果当前要处理的帧是空,则退出循环,也可以用continue跳过当前循环
        if frame is None:
            break
        data = process_img(frame)

        # 可以对帧进行处理用于显示,这里为了不占用处理图像的时间就注释了
        # 也可以把这个放在主进程处理
        # for v in data:
        #     cv2.rectangle(frame, (v[0], v[1]), (v[0] + v[2], v[1] + v[3]), (0, 255, 0), 2)
        # 把处理过后需要显示的帧存入子进程对应的process元素,如sd['process0']
        sd['process'+str(process_id)] = frame

        # 同理在对应的data元素存入识别后的数据,如sd['data0']
        sd['data'+str(process_id)] = data

        # 用于测试子进程是否结束
        print('end',process_id)
以上是子进程用于获取各自需要识别的帧,以及返回各自对应的结果的函数,每个子进程单独存放需要识别的帧以及识别的结果,是防止两个进程识别过快时,后一个进程将前一个的结果覆盖,因此分开存放。下面需要对主进程的调度进行开发。
manger=multiprocessing.Manager()
shared_dict=manger.dict()
# 其他有序号的元素在新建子进程时候一起初始化
shared_dict['run']=True
shared_dict['frame']=None
# 用于显示当前画面的帧,因为可能有图像处理,因此显示帧单独存放一个元素
shared_dict['process'] = None

class capThread(threading.Thread):   #继承父类threading.Thread
    def __init__(self):
        threading.Thread.__init__(self)
        self.frame=None
            self.runFlag=True
    def getFrame(self):
        return self.frame
    def stop_run(self):
        self.runFlag=False
    def run(self):
        cap = cv2.VideoCapture(0)
        cap.set(cv2.CAP_PROP_FRAME_WIDTH, 640)
        cap.set(cv2.CAP_PROP_FRAME_HEIGHT, 480)
        cap.set(cv2.CAP_PROP_FOURCC, cv2.VideoWriter_fourcc('M','J','P','G'))
        if not cap.isOpened():
            print("无法打开摄像头")
            exit()

        # 给多进程用的结束标志这里也可以用上,两种方法都可以结束这个线程
        while self.runFlag and shared_dict['run']:
            ret, frame = cap.read()
            # 如果获取摄像头图像失败,则结束所有进程
            if not ret:
                print("读取摄像头画面失败")
                self.runFlag = False
                shared_dict['run']=False
            # 图像翻转,根据情况使用
            self.frame = cv2.flip(frame, -1)

            # 这里也在共享字典中加一项用于储存摄像头当前的最新图像帧
            shared_dict['frame']=self.frame
            # 当显示帧元素不为空,就进行展示
            # 因为cv2.imshow函数需要和开启摄像头在同一个线程中,因此在这里进行显示
            if shared_dict['process'] is not None:
                cv2.imshow('process',shared_dict['process'])
            time.sleep(0.050)
            print('#',end='')
            if cv2.waitKey(1) & 0xFF == ord("q"):
                shared_dict['run']=False
                self.runFlag = False
                break

# 用于获取当前时间戳,毫秒级的
def now():
    return time.time()*1000

# 两个变量,用于计算识别一次的时间间隔
last_time = int(now()) # micro second
now_time =  int(now())

# 新建摄像头管理的多线程对象,并启动
cap = capThread()
cap.start()

# 等待摄像头初始化,并存入第一帧图像
while shared_dict['frame'] is None:
    time.sleep(0.05)

# 用于记录总时间
count_time = 0
# 用于记录最长识别时间
max_time = 0
# 用于记录最短识别时间
min_time = now()
# 用于记录识别次数
count = 0

# 强制主线程使用的cpu核心
# 因为飞腾派的0,1核是小核,因此让主线程使用0,1核
p=psutil.Process(os.getpid())
p.cpu_affinity([0,1])

# 用于存放子进程对象
process_list=[]

# 用于标记每个进程使用的CPU核序号,也是根据这个决定开启的子进程数量的
# 因为飞腾派小核性能差距很大,因此这里不使用0,1小核,使用2,3大核
# 而一个大核上可以多开几个进程,但是测试下来每个核两个进程和三个进程速度差不多
cpu_core_list = [2,2,3,3]
# 子进程数量
processNum = len(cpu_core_list)#3
# 这个是希望子进程识别间隔的时间,单位是毫秒ms,需要是float类型,后面用到再讲
gip_time = 200.0

# 子进程初始化
for v in range(processNum):
    # 初始化子进程需要用到的带序号的元素
    shared_dict['frame'+str(v)]=None
    shared_dict['data'+str(v)]=None

    # 建立子进程对象,传入需要的参数:共享字典,进程序号,使用CPU核心序号
    p=multiprocessing.Process(target=detect, args=(shared_dict, v, cpu_core_list[v]))
    p.start()

    # 传入当前帧,子进程将进行第一次识别
    # 这里copy函数是拷贝图像到一个新的地址空间
    # 是为了防止frame元素更新时候不更新地址,只更新地址内的图像
    shared_dict['frame'+str(v)] = shared_dict['frame'].copy()
    # 添加到子进程列表,用于后面等待子进程结束时使用
    process_list.append(p)

# 将这时的时间戳最为第一个识别的开始
last_time = int(now())

# 这里的循环是为了等待所有进程初始化
# 因为第一次运行时加载模型时间一般是比较长的,并且时间不是很固定
# 因此先等待所有进程都完成第一次识别,后续的识别时间差距就比较小了
for v in range(processNum):
    while shared_dict['data'+str(v)] is None:
        time.sleep(0.0009)
    shared_dict['data'+str(v)] = None

# 这里循环就是开始第一次识别传入图像
for v in range(processNum):
    shared_dict['frame'+str(v)] = shared_dict['frame'].copy()

    # 根据希望子进程间隔时间进行等待
    # 因为是第一次启动子进程,因此需要人工等待一段时间来实现进程与进程间识别的间隔
    time.sleep(gip_time / 1000.0)
last_time = int(now())
while shared_dict['run']:
    # 将所有进程循环一遍作为一轮循环,也是为了控制各进程的先后顺序
    for v in range(processNum):
        while shared_dict['data'+str(v)] is None:
            time.sleep(0.0009)
        data=shared_dict['data'+str(v)]

        # 记录当前完成识别的时间
        now_time = int(now())
        run_time = now_time - last_time
        print(v,' :',run_time,'ms')
        last_time=now_time
        count_time += run_time
        if run_time > max_time:
            max_time = run_time
        if run_time < min_time:
            min_time = run_time
        count += 1

        '''
        这里主要讲识别的优化,因此机器人的控制逻辑这里就略过了
        '''
        execute_cmd(cmd)

        # 如果识别时间短于希望的间隔时间,则根据差值进行等待
        # 这里就是人工进行调度上的干预
        if run_time < gip_time:
            print('wait ',(gip_time*1.0-run_time)/1000.0)
            time.sleep((gip_time*1.0-run_time)/1000.0)

        shared_dict['frame'+str(v)] = shared_dict['frame']
        shared_dict['data'+str(v)] = None

        # 取出要显示的图像帧,并进行处理
        image = shared_dict['process'+str(v)]
        for vv in data:
            cv2.rectangle(image, (vv[0], vv[1]), (vv[0] + vv[2], vv[1] + vv[3]), (0, 0, 255), 2)
        n=int(now())
        cv2.imwrite('./frame/'+str(n)+'.jpg',image)

        # 存入摄像头管理线程要显示的图像帧中
        shared_dict['process'] = image
# 结束运行,停止所有机器人活动
execute_cmd('stop')
# 等待摄像头管理线程的运行结束
capThread.join()
# 等待所有进程运行结束
for v in process_list:
    v.join()
# 输出时间信息
print('avg time: ','%.2f'%(count_time/count),'ms')
print('max time: ','%.2f'%max_time,'ms')
print('min time: ','%.2f'%min_time,'ms')
另外就是如果不使用
cv2.imshow()进行图像显示,这个时候就没法通过键盘按q进行退出了,可以控制台输入Ctrl + C结束,但实际使用时候,需要多次Ctrl + C才能结束,并且有时候无法彻底结束,也不会输出最后的时间统计信息,因此可以使用对Ctrl + C进行拦截,替换成自己的结束函数。需要使用自带库signal,用法如下。import signal # 定义自己的结束函数,这里的参数应该是signal规定的,照抄即可 def signal_handler(signal, frame): global shared_dict print ('\nSignal Catched! You have just type Ctrl+C!') # 使用共享字典中的运行标志来结束所有进程及线程 shared_dict['run']=False # 将Ctrl + C时发出的结束信号对应的处理函数替换为自己的 # Ctrl + C实际时系统对python运行的进程发出了一个结束的信号 # 因此这里替换的是收到对应信号时候的处理函数 signal.signal(signal.SIGINT, signal_handler)
-
到此为止所做的有关识别方面的优化工作就结束了
关于小车控制
这里就要提到飞腾派小车驱动板上的两个芯片TB6612FNG和PCA9685。这部分控制上没有什么问题,但是出现过几次烧板子的情况。
因为底盘电机也是12V供电,以及机械臂的驱动板也是12V供电,因此最开始是使用了一块电池给三个供电:飞腾派板子、底盘电机和机械臂驱动。但是后来烧了两次,就推测应该是电机和舵机驱动时候产生的电压波动,使飞腾派板子上的变压芯片或者有关的电容烧了,因此需要对这两部分做电源隔离,让飞腾派板子单独一路12V电源。
TB6612FNG芯片的使用
-
TB6612FNG原理图这里只介绍一些和开发代码有关的引脚使用,关于电路怎么设计,及其他引脚有什么含义这里不需要考虑。这里放一张
TB6612FNG的原理图。
TB6612FNG是用来驱动电机的,一个芯片能驱动两个电机,红色蓝色部分表示各自相关的引脚。这里只对红色区域的A组进行介绍,蓝色的B组与之同理。 -
使用方法
驱动一路电机需要三个引脚,就是上面一排红色区域的
PWMA、AIN2、AIN1这是一组,负责驱动下面的A01和A02,这两个引脚是连接电机的。PGND应该是预留的电机接地引脚,这里用不到,有两个A01和A02是为了应对大电流电机的驱动。PWMA引脚比较简单,就是通过PWM来控制电机的速度的,而A01和A02是通过高低电平的不同来控制电机的启停和正反转,具体参见下表,这个表来自芯片的数据手册,对原表进行了简化。INPUT OUTPUT AIN1 AIN2 A01 A02 效果 高 高 低 低 刹车 低 高 低 高 运动 高 低 高 低 反向运动 低 低 OFF OFF 断电滑行 其中运动与反向运动比较好理解,就是电机正反转。刹车指的是电机依然通电,但是无法转动,可以理解为正在运动的电机立马锁死;与之对应的就是断电滑行,就是电机不通电,如果正在运动,则会根据惯性向前滑行。
所以对于电机的控制就只需要两个
IO引脚输出高低电平,以及一个PWM引脚,但是四个电机就需要12个引脚,飞腾派上没有引出这么多,因此就需要下面的芯片了。
PCA9685芯片的使用
-
PCA9685芯片介绍这个芯片是通过
I2C接口控制16路PWM输出,因此就相当于引脚扩展。但如果只是PWM扩展的话,那就只能实现输出PWM方波,即高低电平一直转换,无法实现IO的单输出低电平或者高电平,但是根据这个芯片的特性,也是可以实现和IO一样的功能的。下面先介绍一下这个芯片的使用。
可以看到使用的是
I2C的通信引脚,即SDA和SCL,另外A0~A5是六位地址引脚,用于控制芯片在I2C总线上的地址,这里用不到就不做过多介绍了。LED0~LED15就是扩展的16位引脚了。关于I2C在下一节进行介绍,关于PCA9685的使用可以先理解为就是通过对芯片内寄存器的读写来实现对芯片的控制的,寄存器存在多个,因此读写操作时需要寄存器的地址。下面介绍一下芯片中寄存器的作用。
-
MODE1寄存器 地址0x00
这个寄存器的作用是对芯片做一些配置用的,这8位各有作用,先放一张图可以参考一下,这里只介绍用到的几位。

这里常用的位是D4、D7,其他位保持默认就好,一般也都是0。D4是在修改时钟相关寄存器时候,需要先写1关闭时钟信号输出,然后等写好时钟相关寄存器之后,再对D4写0开启时钟信号,但是写0之后需要再对D7写1进行复位,D7写1复位后会自动把这位清除成0,因此不用写0。
因此,如果除了D4和D7之外,其他位都是0的话,那么修改一次时钟相关寄存器的操作是这样的:
寄存器:0x00,数据:0x10 修改时钟寄存器 寄存器:0x00,数据:0x00 等待500us 寄存器:0x00,数据:0x80 -
PRE_SCALE寄存器 地址0xFE
这个寄存器是用来修改芯片产生的PWM周期的。下面是这个寄存器中值的计算公式:
prescale_value就是要写入寄存器的结果round表示取整,即结果要求证书,向上取整还是向下取整,亦或是四舍五入都可以osc_clock表示芯片的时钟频率,刚才根据MODE1中的D6位可以看出,我们使用内部时钟的话频率是25MHz,所以这个值为250000004096这个常数跟PWM的占空比控制有关,一个PWM周期是被分为了4096份,这个是不可修改的,因此是个常数Frequency表示要修改的PWM周期的频率,例如使用常用的多级的话一个周期是20ms,那这里就是50Hz-1这就是固定操作了,数据手册中给的要求
我们以控制
MG996R或者SG90这种常用的180度舵机为例子,这种舵机需要PWM周期为20ms,所以PWM频率为50Hz,取证使用向下取整,即C语言对整数除法的取整方式,这里可以计算得到结果prescale_value=25000000/4096/50-1=121但是在网上查阅了一下,很多实际使用的时候这个计算出来的周期和实际的周期存在一点误差,因此对这个公式有一个误差修正,具体如下:
可以看到是对频率乘上了
0.98,这个数字是多次测试测出来的一个经验值,修改后再计算刚才舵机的prescale_value可以得到prescale_value=25000000/4096/50/0.98-1=123计算得到
prescale_value的值后,把这个值写入PRE_SCALE寄存器即可,需要结合MODE1寄存器的D4和D7位进行操作。 -
LEDx引脚控制相关寄存器
一共有
16路PWM引脚,在引脚定义上是LED0~LED15,每一路控制方法一样,下面就以LED0为例进行介绍。下面先放一张每个引脚控制对应的寄存器地址图。
可以看到
LED0使用了四个寄存器,地址从0x06到0x09。先介绍一下PCA9685控制PWM占空比的原理,对每个引脚可以在芯片中设置PWM高电平的起始和结束位置,之前介绍PRE_SCALE寄存器时候说过,芯片中对一个PWM周期是会分成4096份的,因此这个起始结束位置也是以这个4096份进行设置的,设置的范围就是0~4095,因为最大可以是4095,所以一个开始或者结束需要两字节存储,那一个引脚的开始加结束就需要四字节,所以这里才有四个寄存器,那么对这四个寄存器的使用应该也有了解了,具体的寄存器含义以LED0为例,如下所示:LED0_ON_L 地址:0x06 起始位置低8位 LED0_ON_H 地址:0x07 起始位置高8位 LED0_OFF_L 地址:0x08 结束位置低8位 LED0_OFF_H 地址:0x09 结束位置高8位下面还以
MG996R或者SG90舵机为例子,假如需要舵机旋转角度为90度,那么对应的高电平需要的时间是1.5ms,因为PWM周期是20ms,所以可以得到高电平时间在整个PWM周期中所占比例为,这里20ms就是对应4096份,因此高电平时间对应的份数应该是,可以取整得到307,那么可以让起始位置在0处,结束位置在307,所以寄存器的设置如下:LED0_ON_L 地址:0x06 数据:0x00 LED0_ON_H 地址:0x07 数据:0x00 LED0_OFF_L 地址:0x08 数据:0x33 LED0_OFF_H 地址:0x09 数据:0x01其实在实际使用时候起始位置都可以设置成
0x00,只需要计算高电平所占份数,得到的结果就可以设置成结束位置,这里LED0_OFF_L的数据0x33就是对307取低八位得到的,LED0_OFF_H的0x01同理是307的高八位。剩下的
15个引脚控制方法相同,寄存器地址就是在LED0的四个地址上增加。还有四个特殊的寄存器,是控制所有的16个引脚,就是0xFA~0xFD,控制方法和控制一个引脚相同,设置完这四个寄存器后,16路PWM输出会变成一样的。
-
-
PCA9685芯片特殊使用前面了解了
PCA9685的作用及工作原理,是可以实现PWM引脚的扩展,但是如果用这个芯片控制之前提到的TB6612FNG芯片的话,还需要更多的IO引脚实现高低电平的控制,因此这里介绍一下使用PCA9685实现IO的功能。-
实现
IO扩展-
实现高电平输出
前面根据
PCA9685的工作原理可以知道,实现PWM的控制是可以在PCA9685中设置每路引脚的高电平起始位置,那么如果需要实现一直输出高电平的话,只需要将起始位置设成0,结束位置设成最大值4095即可,即整个PWM周期从开始时候就输出高电平,直到这个周期结束。还以LED0引脚为例,具体寄存器设置如下:LED0_ON_L 地址:0x06 数据:0x00 LED0_ON_H 地址:0x07 数据:0x00 LED0_OFF_L 地址:0x08 数据:0xff LED0_OFF_H 地址:0x09 数据:0x0f -
实现低电平输出
与高电平输出同理,只需要将开始和结束位置设成一样即可,在开始输出高电平的时候也是结束的时候,那就一直是低电平了。以
LED0引脚为例,具体寄存器设置如下:LED0_ON_L 地址:0x06 数据:0x00 LED0_ON_H 地址:0x07 数据:0x00 LED0_OFF_L 地址:0x08 数据:0x00 LED0_OFF_H 地址:0x09 数据:0x00可以设置成别的值,只要起始和结束中的值一样即可,但一般设置成
0x00更方便。
-
-
I2C的使用
-
I2C使用在飞腾派使用以及飞腾小车的开发过程中我们不需要编写
I2C驱动,因此这里不对I2C的时序、发送的数据格式等等做介绍,这里简单介绍一下I2C协议以及如何在Linux下和Python中使用。-
I2C介绍没有了解过硬件相关知识的人可以这么理解
I2C,就是所有数据都是根据寄存器地址进行读写的,另外I2C是一个总线协议,因此所有芯片都是连在相同的两根线上,即是共用的;所以每次读的时候,就是给I2C总线发送要读设备地址和寄存器地址;同理,写的时候,就是发送要写的设备地址、寄存器地址和要写的数据。在同一个
I2C总线上的芯片都会接收到每次发送的请求,芯片会进行设备地址校验,如果不是自己的设备地址,那就不会响应这次请求。
-
在
Linux下使用I2C在
Linux下使用I2C有一个工具i2c-tools,飞腾派官方镜像中是自带这个的,如果没有的话可以在终端运行下面命令安装一下。sudo apt-get install i2c-tools这个工具里包含很多命令,下面一个一个来说。
-
i2cdetect扫描I2C总线并列出已连接的设备首先在一个开发板或者
PC上是可能有多个I2C总线的,因此可以先列出所有的I2C总线。i2cdetect -l返回的内容格式如下:
i2c-3   i2c         56247000.i2c            I2C adapter
i2c-2   i2c         56226000.i2c            I2C adapter
其中
i2c-2和i2c-3就表示可以用的总线号为2和3。这个是PC端才会有的参数,并不是I2C协议自带定义的,假如使用单片机这种MCU编程控制的话,一般不涉及到总线号这个参数。知道可用的总线后,便可以使用如下命令查看一个总线上的所有设备。
i2cdetect -r -y 2返回的内容格式如下:
     0  1  2  3  4  5  6  7  8  9  a  b  c  d  e  f
00:          -- -- -- -- -- -- -- -- -- -- -- -- --
10: -- -- -- -- -- -- -- -- -- -- -- -- -- -- -- --
20: -- -- -- -- -- -- -- -- -- -- UU -- -- -- -- --
30: -- -- -- -- -- -- -- -- -- -- -- -- -- -- -- --
40: -- -- -- -- -- -- -- -- -- -- -- -- -- -- -- --
50: -- -- -- -- -- -- -- -- -- -- -- -- -- -- -- --
60: UU -- -- -- -- -- -- -- -- -- -- -- -- -- -- --
70: -- -- -- -- -- -- -- --
以上面这个返回为例子,可以看到在总线
2上有两个设备,地址分别为0x2a和0x60,在不为--的位置上把行和列加起来就是设备的地址,有时候会显示UU,有时候也会直接显示设备地址。 -
i2cdump显示I2C设备的所有寄存器内容知道可用总线及设备后,接下来可以对设备进行读写了,先说一下读取,有两种方式,一种是直接读取设备所有寄存器数据,就是这个
i2cdump指令,另一个是i2cget,只读取一个寄存器,这个下面再讲。i2cdump的使用举例如下:i2cdump -f -y 2 0x2a这里就是指定了要读取的总线及设备的地址,返回的结果格式如下:
No size specified (using byte-data access)
    0  1  2  3  4  5  6  7  8  9  a  b  c  d  e  f    0123456789abcdef
00: da 00 81 00 fb 03 00 00 00 00 00 43 01 03 00 00   ?.?.??.....C??..
10: 55 55 55 00 00 00 00 00 00 00 00 00 00 00 00 00   UUU.............
20: 00 00 00 00 00 00 00 00 00 00 00 00 00 00 00 00   ................
30: 00 00 00 00 00 00 00 00 00 00 00 00 00 00 00 00   ................
40: 00 00 00 00 00 00 00 00 00 00 00 00 00 00 00 00   ................
50: 00 00 00 00 00 00 00 00 00 00 00 00 00 00 00 00   ................
60: 00 00 00 00 00 00 00 00 00 00 00 00 00 00 00 00   ................
70: 00 00 00 00 00 00 00 00 00 00 00 00 00 00 00 00   ................
80: 00 00 00 00 00 00 00 00 00 00 00 00 00 00 00 00   ................
90: 00 00 00 00 00 00 00 00 00 00 00 00 00 00 00 00   ................
a0: 00 00 00 00 00 00 00 00 00 00 00 00 00 00 00 00   ................
b0: 00 00 00 00 00 00 00 00 00 00 00 00 00 00 00 00   ................
c0: 00 00 00 00 00 00 00 00 00 00 00 00 00 00 00 00   ................
d0: 00 00 00 00 00 00 00 00 00 00 00 00 00 00 00 00   ................
e0: 00 00 00 00 00 00 00 00 00 00 00 00 00 00 00 00   ................
f0: 00 00 00 00 00 00 00 00 00 00 00 00 00 00 00 00   ................
就是一个类似表格的形式,展示设备中所有寄存器的数据,右边是一个转
ASCII字符的展示。这个指令可以方便的查看设备寄存器数据,调试时候比较好用。 -
i2cget从指定寄存器中读取数据下面介绍读取指定寄存器数据的指令。
i2cget一次可以读出来一个寄存器的数据,使用举例如下:sudo i2cget -y 2 0x2a 0x02这里就是读取总线
2上的设备地址为0x2a的芯片上寄存器地址为0x02中的数据。返回内容就是十六进制的一个字节的数据。0x81 -
i2cset向指定I2C设备的寄存器中写入数据下面介绍向寄存器中写入数据,
i2cset指令一次只能写入一个寄存器数据,使用距离如下:i2cset -f -y 2 0x2a 0x77 0x3f这里就是向总线
2上设备地址为0x2a的芯片上寄存器地址为0x77中写入数据0x3f,这个指令正确执行时候没有返回。如果想验证是否写入成功可以读取寄存器数据进行查看。
-
-
在
Python下使用I2C因为在开发飞腾派小车时候是飞腾派连接
PCA9685,再由PCA9685连接TB6612FNG,所以需要学习Python下使用I2C。-
安装所需库
smbus需要安装第三方库
smbus,使用pip管理Python库的话,使用如下命令安装。pip3 install smbus如果是使用
apt管理Python的库的话,使用如下命令安装smbus。sudo apt-get update sudo apt-get install python3-smbus有时候
apt可能找不到需要的包,因此需要先update更新一下。 -
声明总线对象
使用如下代码声明一个总线对象,所需参数为要控制的总线号。
import smbus bus = smbus.SMBus(2) -
向总线上发送写寄存器指令 WRITE
使用如下函数写寄存器。
addr  = 0x60
reg   = 0x00
value = 0x10

bus.write_byte_data(addr, reg, value)
其中
addr就是设备在总线上的地址,这个可以用之前的Linux下的i2c-tools工具查找;reg就是要写的寄存器地址,value就是要写的数据,这三个参数都是一个字节大小,格式也和之前的在Linux下的i2cset差不多。 -
向总线上发送读寄存器指令 READ
使用如下函数读寄存器。
addr  = 0x60
reg   = 0x00

bus.read_byte_data(addr, reg)
其中
addr就是设备在总线上的地址,这个可以用之前的Linux下的i2c-tools工具查找;reg就是要写的寄存器地址,这两个参数都是一个字节大小,和写寄存器的函数一样,格式也和之前的在Linux下的i2cget差不多。
到这里在Python下使用I2C的基本功能就介绍完了。
-
-